MYNAH: Audio Sampler
User Manual V1.0
Table of Contents
Hardware Overview
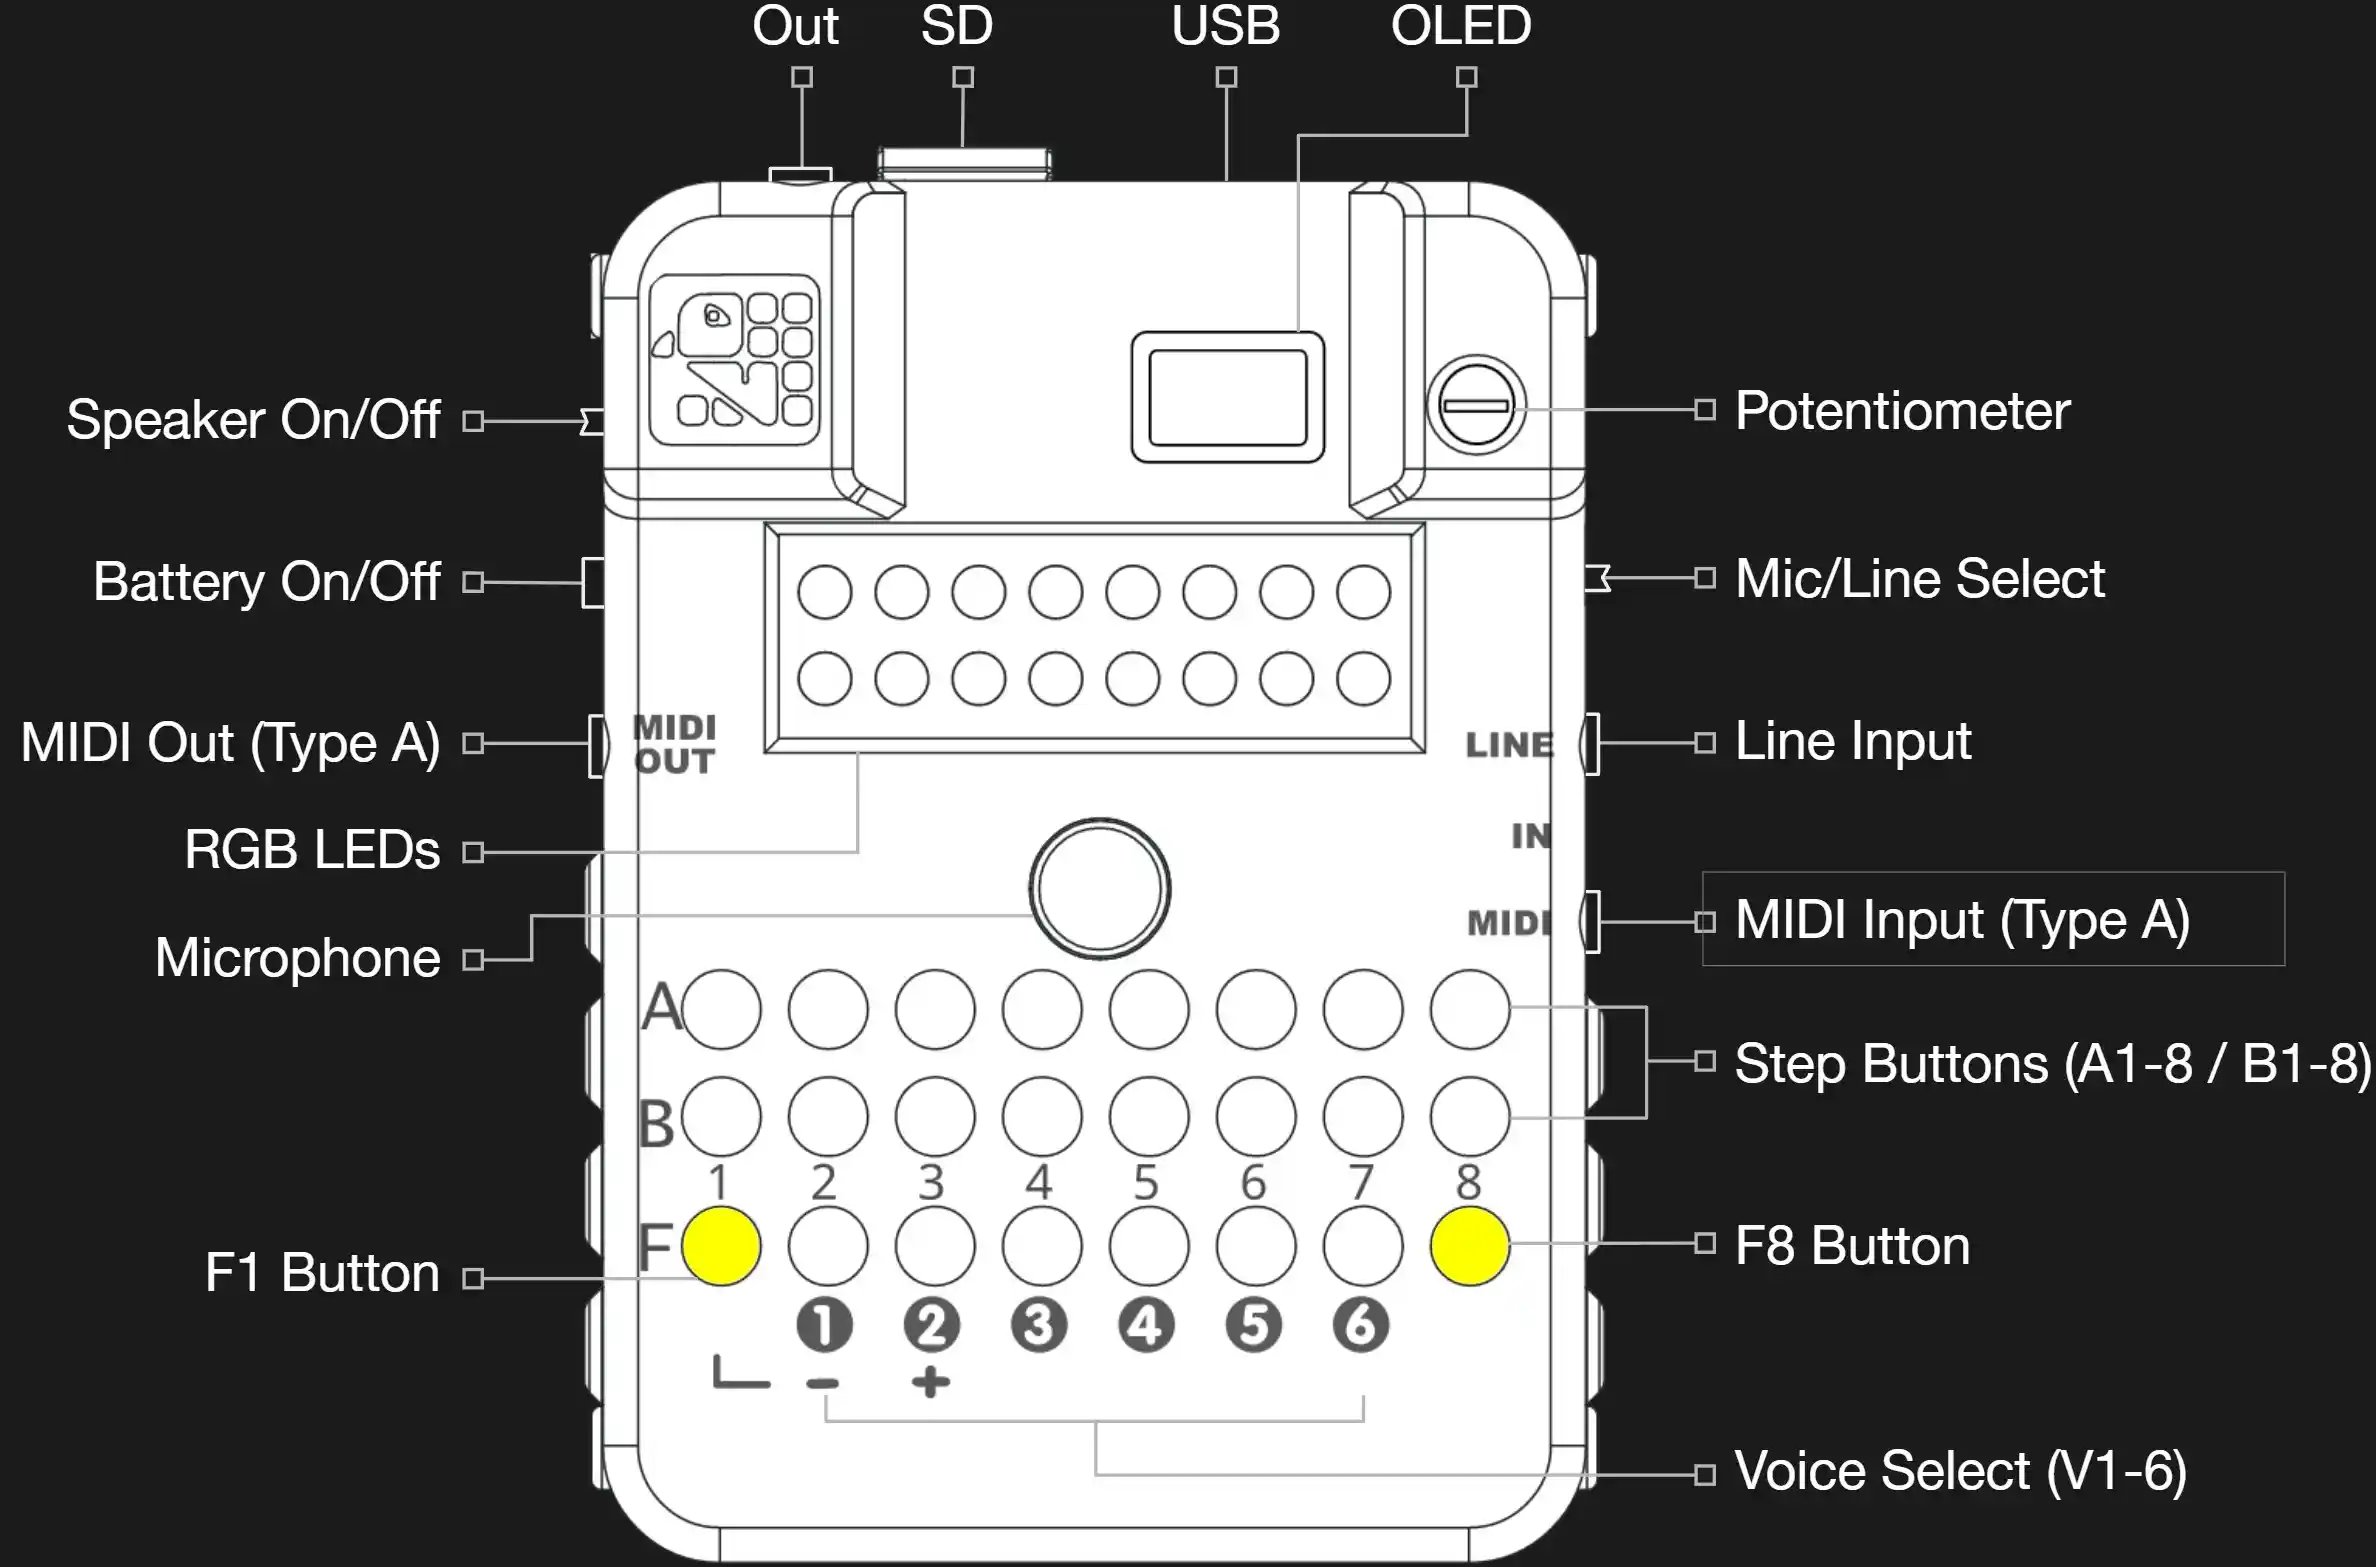
Device Description
MYNAH is a powerful 6-voice polyphonic audio sampler built around the ESP32-S3 microcontroller. It features a 16-step step sequencer, dual audio inputs (microphone and line-in), and comprehensive sound design tools including filters, delays, and reverb effects.
Feature & Component Overview
Processing and Playback:
- 6-voice polyphonic sampler with 16-step sequencing
- Three sample play modes per voice: SINGLE, SL 16 (16 equal slices), SL TRS (transient-detected slices)
Sampling, Recording, and Storage:
- Up to 16 samples per song, stored on microSD
- Total sample storage: up to ~2 minutes across all 16 slots combined
- Live recording from microphone or line-in
- Maximum recording per take: ~20 seconds (mic mono) or ~10 seconds (line stereo)
- SD card support: FAT32, nested folders (full path up to 63 characters)
- WAV import support: PCM 8/16/24/32-bit integer or 32-bit float, mono or stereo, any sample rate (auto-converted to 32 kHz mono internally)
Sequencing and Arrangement:
- 16-step patterns with adjustable length (1-16 steps)
- Tempo: 30-240 BPM with swing control
- Step conditions for deterministic and generative variation
- Pattern save/load: 16 pattern slots per song
- Song Sequencer: up to 128 steps per song (each step plays one full pattern; actual bar length depends on the pattern’s step division)
- Project structure: 16 songs per bank, 16 banks total
Sound Design and FX:
- Per-voice controls: Pitch, Velocity, Pan, Delay Send, Reverb Send, EQ (DJ-style LPF/HPF), Boost (0-24 dB pre-volume gain)
- Master effects: Delay, Reverb, Low-pass Filter, Bit Crusher
- Master FX modes: Gater (16 rhythmic patterns), Filter, Phase/Chorus, Retrig (16 tempo-synced retrigger patterns)
Hardware Interface and I/O:
- Stereo audio output
- Dual audio inputs: built-in microphone + stereo line-in, selectable by hardware slide switch
- OLED display for real-time mode/value/status feedback
- 24 tactile buttons (16 step + 8 function)
- Single potentiometer with pickup mode (turn through the current value to take control — prevents value jumps when switching modes); in most parameter modes, holding a step button while turning the pot sets that parameter for that step only (per-step automation), overriding the voice-wide default; holding F1 while turning the pot during sequencer playback records automation to the currently playing step; some sub-modes use a button press to trigger an action rather than the pot — in those cases the Potentiometer entry in the reference section will read “No effect”
- 16 RGB LEDs for step, voice, and record-state visualization
Quick Start Guide
Initial Setup
1. First Power-On
- Insert an SD card and apply power via USB-C
- The device initializes automatically and shows the startup logo on the OLED
- If an SD card is present, it is detected and enabled

2. Load or Create Samples
Option A: Use Built-In Samples
- 16 default samples are pre-loaded at startup — no setup required
Option B: Record New Samples
- See Recording Audio section below
Option C: Load Samples from SD Card
- Place WAV files on your SD card (PCM 8/16/24/32-bit or 32-bit float, mono or stereo, any sample rate — auto-converted to 32 kHz mono on import)
- Open the Sample Browser to import them (see Importing Samples)
- ⚠️ The full file path must be 63 characters or fewer — shorten folder/file names if import silently fails
3. Play Samples & Enter Steps into a Pattern
- Press a Voice Button (V1-V6) to select a voice
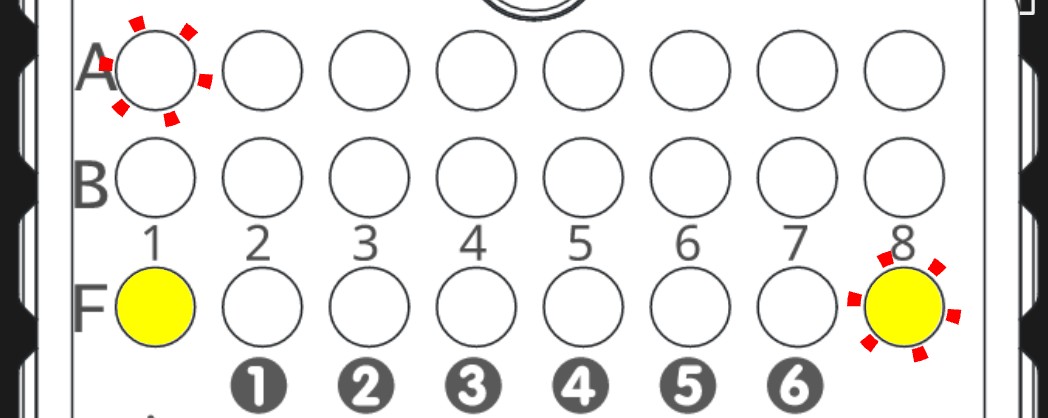
- Option A — Step Sequencer: Press Step Buttons (A1-A8 or B1-B8) to toggle steps on/off; press F8 to start/stop the sequencer and hear the pattern (you will see the blue playhead progress through the steps)
- Option B — Live Play: Press F8 + V6 to toggle Live Play mode, which turns the 16 step buttons into a real-time keyboard or drum pad. Press F8 + V6 again to return to step-edit mode. See Live Play Mode for details

4. Save a Pattern
- Press F8 + A1 to access PATTERN_SELECT mode
- Long-press any Step Button (A1-B8) to save the current pattern to that slot (1-16)
- The pattern is saved to SD card and persists across power cycles
5. Load a Demo or Different Pattern
Demo songs are stored in Bank 16. To get there: press F8 + A3 (BANK_SELECT) and press B8 (the 16th step button) to switch to Bank 16, then press F8 + A2 (SONG_SELECT) to choose a demo song, then press F8 + A1 (PATTERN_SELECT) and short-press a green slot to load a pattern. After loading a pattern, the song sequence also becomes available – access it with F8 + A4 (SONG_SEQUENCE).
- Press F8 + A1 to access PATTERN_SELECT mode
- Short-press a green step button to load that saved pattern slot
- If the pattern currently in memory has unsaved changes, a “LOSE CHANGES?” confirmation appears — press the same button again to confirm, or any other button to cancel
6. Make a Recording
- Press F1 + F8 to enter REC_MODE
- Select your source with the slide switch on the right side of the device (mic or line-in)
- Hold (long-press) a Step Button (A1-B8) to choose the destination sample slot
- A count-in starts automatically (default 4 beats; adjustable with the pot while on the recording page)
- Record your audio — press any button to stop
- The recording is automatically imported to the chosen slot and ready to play
- For detailed instructions, see Recording Audio
7. Start Fresh (Empty Pattern + Default Samples)
- Press F8 + A2 to access SONG_SELECT mode and press a dim blue step button to load a blank song
- Press F8 + A1 to access PATTERN_SELECT mode and press any dim purple step button to load an empty pattern
- You now have a blank canvas with the default samples ready to play
- ⚠️ Loading an empty pattern slot alone is not enough — without switching to a blank song first, the previously loaded samples remain in memory
Operating Modes
Access: Modes are selected via button combinations. All detailed mode parameters and controls are documented below.
Voice-Specific Modes
These modes control individual voice parameters. Select a voice with V1-V6 buttons (Voice 1-6), then use F1 + Step buttons to access modes.
A-Row Modes (F1 + A1–A8)
F1+A1: Sample Select (SMP) / Sample Browser
- Access: Press F1+A1 to cycle through modes:
- [1] SMP → [2] SAMPLE_BROWSER → back to [1]
[1] Sample Select (SMP)
- Purpose: Choose which sample (1-16) plays for this voice/step
- Potentiometer: Adjust sample number
- Range: 1-16 (0 = off/silent)
- Display: Shows current sample index
[2] Sample Browser
- Access: Press F1+A1 while in Sample Select (SMP) to toggle into this mode
- Purpose: Browse and load samples from SD card
- Navigation:
- F1 (release): Navigate up one folder level
- F1 + V1: Move selection up (previous item)
- F1 + V2: Move selection down (next item)
- F8 (press): Enter folder or load selected file
- File Types: WAV and S16 files
- Path Support: Nested folders up to 64 characters
- Display: Shows current folder and file list on OLED
- Exit: Select a file to load, or switch modes with F1 + Step buttons
- Sample Slot: Loaded file is assigned to the sample slot of the current voice
Sample Preview
When you navigate to a WAV file (via the potentiometer or F1+V1/V2), the device automatically prepares a preview:
- Preparation bar: A thin progress bar appears at the very bottom of the OLED display while the preview is being loaded. It fills left-to-right as loading progresses. There is no hard time limit — large files may take a few seconds, and the bar keeps you informed.
- Silence skip: The preview automatically fast-forwards to the first audible content in the file (up to 10 seconds of leading silence is scanned). A short 50 ms pre-roll before the onset is preserved so transient attacks are not clipped. If no onset is found within 10 seconds the preview starts from the beginning. The full sample (silence included) is still imported when you assign it to a slot.
- Preview length: Only up to 4 seconds of audio from the onset point are loaded — enough to identify the sound while keeping load times short.
- Rhythmic playback: Once loaded, the preview fires on steps 1 and 9 of the running pattern (every half-bar) so you can audition the sample in time with your beat. If the sequencer is paused the preview fires once immediately on load.
⚠️ Path Length Limit — 63 characters maximum
The full file path (folder + filename, e.g. /SAMPLES/MY_FOLDER/MYFILE.WAV) must be 63 characters or fewer (including the leading /). If the path is longer, the file will preview correctly but will silently fail to import — the browser will return to SAMPLE_SELECT without loading anything.
Example of a path that is too long:
/SAMPLES/AUTHENTIC_VINYL_BREAKS_DEMOS/AUTHENTIC_VINYL_BREAKS_DE… ← truncated, import failsFix: Shorten your folder and file names on the SD card. A safe rule of thumb:
- Keep folder names under 20 characters
- Keep filenames under 30 characters
- Avoid deeply nested subfolders
F1+A2: Sample Pitch (PTC)
- Purpose: Transpose playback pitch up/down in semitone steps
- Potentiometer: Adjust pitch offset
- Range: Semitone steps (chromatic)
- Interaction with Scale Root: PTC is a semitone offset applied on top of the global Scale Root note (set via F8 + B1). When the Scale Root is changed — for example to transpose a song to a new key — all voices with a non-zero PTC value shift with it, preserving their interval relationships relative to the root. A PTC value of 0 means the voice plays at the Scale Root pitch; positive values shift the voice up, negative values shift it down.
- Per-step: Hold a step button while adjusting to set the pitch offset for that step only, enabling melodic sequences within a pattern
- Use: Harmonise multiple voices by setting different PTC offsets (e.g. +4 for a major third, +7 for a fifth), then transpose the entire arrangement in real time by adjusting the Scale Root
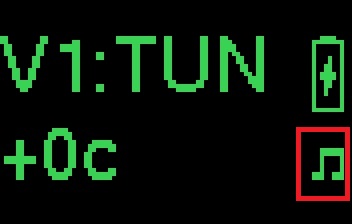
F1+A3: Tuning / Tune Manual / Tune Auto (TUN / TMNU / TAUT)
- Access: Press F1 + A3 to cycle through the three tuning modes:
- [1] SAMPLE TUNING (TUN) → [2] TUNE MANUAL (TMNU) → [3] TUNE AUTO (TAUT) → back to [1]
[1] Sample Tuning (TUN)
- Purpose: Fine-tune the sample pitch with the potentiometer
- Potentiometer: Adjust fine pitch offset
- Effect: Precise pitch tuning beyond semitone steps
[2] Tune Manual (TMNU)
- Purpose: Set a persistent per-sample pitch correction by ear — turn the pot to tune the sample to a reference pitch
- How to use: Hold any step button and adjust the potentiometer — the sample plays back in real time as you turn the pot, letting you dial in the correct pitch by ear
- Potentiometer: Adjusts the manual tuning offset
- Effect: Offset is stored as a persistent per-sample correction and applied at playback time
- Use: Tune a detuned sample to match other voices or a MIDI keyboard
[3] Tune Auto (TAUT)
- Purpose: Automatic pitch detection — the firmware analyses the loaded sample and sets a tuning offset so the sample plays at its natural pitch relative to the global scale
- Potentiometer: No effect; offset is derived from analysis of the sample waveform
- Effect: Calculated offset is applied immediately and stored per sample
- How to use: Hold any step button while in TAUT mode to trigger analysis.
F1+A4: Sample Velocity / Velocity to Cutoff (VEL / VCUT)
- Access: Press F1 + A4 to cycle between the two sub-modes:
- [1] SAMPLE VELOCITY (VEL) → [2] VELO TO CUTOFF (VCUT) → back to [1]
[1] Sample Velocity (VEL)
- Purpose: Set note velocity (loudness) per step
- Potentiometer: Adjust velocity amount
- Range: 0–100% (0% = silent, 100% = maximum)
- Effect: Combines with voice volume for final output level
[2] Velocity to Cutoff (VCUT)
- Purpose: Control how much incoming MIDI note velocity (or per-step velocity) opens a per-voice low-pass filter
- Potentiometer: Adjust sensitivity (0–100%)
- Effect: Higher velocity opens the filter further; lower velocity keeps the filter more closed, adding natural dynamic brightness variation
- Default: 0 (velocity has no effect on the filter)
F1+A5: Sample Pan (PAN)
- Purpose: Position sound in stereo field (left/right)
- Potentiometer: Adjust pan position
- Display: L100% (fully left) → C (centre) → R100% (fully right)
F1+A6: Delay Send (DSND)
- Purpose: Set the amount of signal sent to the delay effect for this voice
- Potentiometer: Adjust delay send amount
- Range: 0–100% (0% = no delay, 100% = full send)
- Effect: Per-voice delay send level
F1+A7: Reverb Send (RSND)
- Purpose: Set the amount of signal sent to the reverb effect for this voice
- Potentiometer: Adjust reverb send amount
- Range: 0–100% (0% = no reverb, 100% = full send)
- Effect: Per-voice reverb send level
F1+A8: Volume / Voice Boost (VOL / BST)
- Access: Press F1 + A8 to cycle between the two gain-control sub-modes:
- First press (or if not already in this group): enters [1] VOL (per-voice volume)
- Next press: advances to [2] BST (per-voice boost)
- The OLED header shows [1] or [2] to indicate the active sub-mode
[1] Volume (VOL)
- Purpose: Set the output volume for this voice
- Potentiometer: Adjust voice volume
- Range: 0–100%
- Shortcut: Also accessible by holding V1-V6 (voice select) + potentiometer
- Signal path: Post-boost, pre-master
[2] Voice Boost (BST)
- Purpose: Apply a fixed pre-volume gain boost to a voice whose samples are particularly quiet. Boost raises the voice’s signal level before it reaches the Volume control, effects sends, and the master mix.
- Potentiometer: Adjust boost amount
- Range: +0.0 dB (pot fully CCW, default) to +24.0 dB (pot fully CW)
- Display: Shows V# +X.XdB (e.g. V1 +6.0dB)
- Nudge (F1+V1 / F1+V2): Step ±0.5 dB
- Default: 0 dB (no boost) — boost is bypassed entirely at 0 dB and has zero CPU overhead
- Signal path: Applied before Volume, before effects sends, before master output
- Non-automatable: Boost is a fixed per-voice gain correction stored in the pattern; it cannot be automated per-step
- Saved: Stored per-voice in the pattern (saved and recalled with each pattern slot)
- Use case: Compensate for samples that were recorded or exported at a low level. Rather than re-normalising audio files, dial in a few dB of Boost to match loudness across voices.
B-Row Modes (F1 + B1–B8)
F1+B1: Sample Start / Sample End / Sample Crop (SST / SEN / CRP)
- Access: Press F1 + B1 to cycle through the three sub-modes:
- [1] SAMPLE START (SST) → [2] SAMPLE END (SEN) → [3] SAMPLE CROP (CRP) → back to [1]
- The OLED header shows [1], [2], or [3] to indicate the active sub-mode
[1] Sample Start (SST)
- Purpose: Set the playback start position within the sample
- Potentiometer: Adjusts start point (0-100% of sample length)
- Display: OLED waveform stays visible during pot adjustment (no alert popup while moving); alert still shown on mode entry
- Per-step: Hold a step button while adjusting to set start point for that step only
- Nudge (F1+V1 / F1+V2): Step backward/forward one zero-crossing at a time; automatically skips over silent regions when traversing silence
- Use: Chop into a sample, skip silences, or create stutter effects
In SL 16 / SL TRS modes, SST adjusts the start boundary of the currently selected slice rather than a global sample start:
- The “currently selected slice” is the one assigned to the active or last-touched step
- The OLED waveform zooms to show a 3-slice context window — the slice before, the selected slice, and the slice after — so fine adjustments are easy to see
- Nudge skips silent regions within the context window
- The minimum start boundary is clamped to the end of the previous slice (slices cannot overlap)
- Slice boundary edits are saved with the pattern and restored on reload
[2] Sample End (SEN)
- Purpose: Set the playback end position within the sample
- Potentiometer: Adjusts end point (0-100% of sample length)
- Display: OLED waveform stays visible during pot adjustment (no alert popup while moving); alert still shown on mode entry
- Per-step: Hold a step button while adjusting to set end point for that step only
- Nudge (F1+V1 / F1+V2): Step backward/forward one zero-crossing at a time; automatically skips over silent regions when traversing silence
- Use: Shorten samples, isolate a region, or combined with start point to isolate a segment
In SL 16 / SL TRS modes, SEN adjusts the end boundary of the currently selected slice:
- The OLED waveform shows the same 3-slice context zoom as SST
- The maximum end boundary is clamped to the start of the next slice (slices cannot overlap)
- Slice boundary edits are saved with the pattern and restored on reload
[3] Sample Crop (CRP)
- Purpose: Permanently trim the loaded sample to its current Start and End points and save the result to SD card
- Potentiometer: No effect
- Confirm: Press B1 to execute the crop — the OLED will show a confirmation prompt before proceeding
- Output: Writes the trimmed region as a new WAV file to
/SAMPLES/BOUNCED/and reloads it into the current sample slot - Use: Destructively trim a long sample down to just the region defined by SST and SEN — reduces storage usage and simplifies further editing
- Note: The original file on SD card is preserved; Sample Crop creates a new file
Note — Sample Start / End automation and LFO targeting: Per-step automation of Sample Start (SST) and Sample End (SEN), as well as LFO targeting of SST/SEN, are only supported in SINGLE mode. In SL 16 and SL TRS modes these values are ignored — use the Slice Select (SLC) mode to address individual slices instead.
F1+B2: Per-Voice LFO (LSHP / LRAT / LDEP / LTGT)
- Purpose: Apply a tempo-synced Low Frequency Oscillator to continuously or trigger-time modulate a per-voice parameter
- Access: Press F1 + B2 to cycle through the four LFO sub-modes:
- [1] LFO SHAPE → [2] LFO RATE → [3] LFO DEPTH → [4] LFO TARGET
- The OLED header shows [1]–[4] to indicate the active sub-mode
- Per-voice: Each voice has its own independent LFO with its own shape, rate, depth, and target
- Enable/Disable: Set [3] LFO DEPTH to 0 to disable the LFO for the selected voice; any depth > 0 activates it
[1] LFO Shape (LSHP)
- Purpose: Select the waveform that drives the modulation
- Potentiometer: Selects one of 6 shapes across the pot travel
- Display: Shows shape label (SINE, TRI, SAWUP, SAWDN, SQ, RNDM)
| Shape | Label | Description |
|---|---|---|
| Sine | SINE | Smooth, rounded oscillation — natural-sounding vibrato, tremolo |
| Triangle | TRI | Linear up/down ramp — similar to sine but with harder corners |
| Sawtooth Up | SAWUP | Ramps up smoothly then resets — one-directional sweeps |
| Sawtooth Down | SAWDN | Ramps down smoothly then resets — falling sweeps |
| Square | SQ | Abrupt on/off switching — gating, trill, stepped modulation |
| Smooth Random | RNDM | Linearly interpolates between random values each half-cycle — organic, unpredictable modulation |
[2] LFO Rate (LRAT)
- Purpose: Set how fast the LFO oscillates, locked to sequencer tempo
- Potentiometer: Selects one of 8 musical divisions
- Display: Shows division label
- Tempo-sync: Rate is always relative to the current BPM — changing tempo adjusts LFO speed automatically
| Division | Label | Speed at 120 BPM |
|---|---|---|
| 1/32 note | 1/32 | Very fast (~27 Hz) |
| 1/16 note | 1/16 | Fast (~13 Hz) |
| 1/8 note | 1/8 | Medium-fast (~7 Hz) |
| 1/4 note | 1/4 | Medium (~3 Hz) |
| 1/2 note | 1/2 | Slow (~2 Hz) |
| 1 bar | 1BAR | Very slow |
| 2 bars | 2BAR | Very slow sweep |
| 4 bars | 4BAR | Extremely slow sweep |
[3] LFO Depth (LDEP)
- Purpose: Set the modulation intensity
- Potentiometer: Full pot travel = 0–100% depth
- Range: OFF (at 0%) or 1–100%
- Display: Shows 0–100% (or OFF at 0%)
- Tip: Start with a low depth (around 10–15%) and increase gradually to taste
[4] LFO Target (LTGT)
- Purpose: Select which voice parameter the LFO modulates
- Potentiometer: Selects one of 15 targets
- Display: Shows target label
LFO targets fall into two categories:
Continuous targets — modulation is applied every sequencer pulse while the voice is active:
| Target | Label | Parameter modulated |
|---|---|---|
| Velocity | VEL | Per-step velocity level |
| Pan | PAN | Stereo pan position |
| Fine Tune | TUN | Fine-pitch offset (micro-pitch wobble) |
| Delay Send | DLY | Per-voice delay send amount |
| Reverb Send | RVB | Per-voice reverb send amount |
| Voice EQ | EQ | DJ-style per-voice filter position |
| Filter Q | FLQ | Per-voice filter resonance |
| Volume | VOL | Per-voice volume level |
Trigger-time targets — modulation is sampled once at the moment a step fires and applied as an offset to the trigger value for that note:
| Target | Label | Parameter modulated |
|---|---|---|
| Pitch (semitone) | PTC | Semitone pitch offset at trigger |
| Attack | ATK | ADSR attack time at trigger |
| Decay | DEC | ADSR decay time at trigger |
| Sustain | SUS | ADSR sustain level at trigger |
| Release | REL | ADSR release time at trigger |
| Sample Start | SST | Sample start point at trigger |
| Sample End | SEN | Sample end point at trigger |
Notes:
- The LFO phase resets when the LFO Rate is changed (re-locks to sequencer grid)
- Changing LFO Rate while the sequencer is running takes effect immediately
- Trigger-time targets (PTC, ATK, DEC, SUS, REL, SST, SEN) only apply at the moment a step fires; they do not continuously modulate a playing voice
- The LFO phase is not reset on each trigger — it runs continuously relative to the sequencer clock, giving evolving variation across loops
- LFO targeting of SST and SEN is only active in SINGLE mode. When the voice sample mode is SL 16 or SL TRS, LFO modulation of Sample Start and Sample End is ignored.
- Trigger-time LFO targets work independently of per-step automation: if both are set for the same parameter, the per-step automation value is used as the base and the LFO offset is added on top at trigger time
Creative Uses
- Vibrato: Target TUN with SINE shape at 1/4 note rate, low depth (~15) for subtle pitch wobble
- Tremolo: Target VOL or VEL with TRIANGLE shape at 1/8 or 1/4 note rate
- Auto-pan: Target PAN with SINE or SAWUP shape at 1 or 2 bar rate
- Rhythmic filter: Target EQ with SQUARE shape at 1/4 or 1/8 note rate for a gating filter effect
- Random pitch: Target PTC with RNDM shape at 1/4 or 1/8 note rate for an unpredictable melody variation
- Evolving texture: Target SST with SAWUP or RNDM at 2BAR or 4BAR for slowly shifting sample start positions
- Pumping reverb: Target RVB with SAWDN at 1/4 note to duck and swell reverb with each beat
F1+B3: Sample Mode (MOD)
- Purpose: Choose how the sample is subdivided and triggered for the active voice
- Potentiometer: Selects one of three modes across the pot travel:
| Pot position | OLED display | Behaviour |
|---|---|---|
| Left third (CCW) | SINGLE | Plays the whole sample (or start/end region) as one continuous note |
| Middle third | SL 16 | Divides the sample into 16 equal slices; each step can target any slice |
| Right third (CW) | SL TRS | Detects up to 16 transient onsets automatically and places slice boundaries there |
- On mode change: Slice boundaries are (re)calculated immediately
- Display: Alert shows SINGLE, SL 16, or SL TRS on change
- Saved: Play mode is stored per voice in the pattern
F1+B4: Slice Select (SLC)
- Purpose: Assign a specific slice to one or more sequencer steps (requires SL 16 or SL TRS mode)
- Potentiometer: Selects slice number or auto:
- Auto (0): Steps cycle through slices sequentially (OLED shows 1-16 or 1-N)
- SL1–SL16: Force all affected steps to always trigger that specific slice
- Scope of assignment:
- F1 held: Applies to the currently playing step only (automation)
- Step button held: Applies to that specific step
- Neither held: Applies to all active steps for the current voice
- In SINGLE mode: Pot has no effect; OLED shows N/A
- Display: Alert shows SL1–SL16 or 1-N (auto range)
- Creative use: Address individual hits in a drum break, or map different drum sounds from one sample to different steps
F1+B5: ADSR Envelope (ATC / DEC / SUS / REL)
- Purpose: Shape the amplitude envelope for each triggered step using a four-stage Attack–Decay–Sustain–Release envelope
- Access: Press F1 + B5 repeatedly to cycle through the four stages in order: [1]ATTACK → [2]DECAY → [3]SUSTAIN → [4]RELEASE → back to [1]ATTACK
- Potentiometer: Sets the value for the currently active stage
- Scope of assignment (applies to all four stages):
- F1 held: Records automation to the currently playing step only
- Step button held: Applies to that specific step
- Neither held: Applies to all steps for the current voice
- Saved: All four ADSR values are stored per-voice, per-step in the pattern
- Defaults: Attack = 0 (OFF), Decay = 0 (OFF), Sustain = 255 (100%), Release = 0 (OFF) — envelope is effectively bypassed on fresh patterns
[1] Attack (ATC)
- Range: OFF (0 ms) to 127 ms; each pot increment ≈ 0.5 ms
- Effect: Linearly ramps amplitude from silence to full level at the start of each triggered step
- Display: Alert shows
ATC OFForATC {N}ms; OLED header V#:ATC
[2] Decay (DEC)
- Range: OFF (0 ms) to 1020 ms; each pot increment ≈ 4 ms
- Effect: After the attack phase completes, amplitude ramps down to the Sustain level over the set duration
- Display: Alert shows
DEC OFForDEC {N}ms; OLED header V#:DEC
[3] Sustain (SUS)
- Range: 0–100%; default = 100%
- Effect: The amplitude level held continuously after the Decay phase completes, until the Release phase begins. Only meaningful when Decay > 0; if Decay is 0, this value has no effect and the voice plays at full level throughout
- Display: Alert shows
SUS {N}%; OLED header V#:SUS
[4] Release (REL)
- Range: OFF (0 ms) to 1020 ms; each pot increment ≈ 4 ms
- Effect: Linearly ramps amplitude from the Sustain level down to silence over the set duration; the starting level of the ramp is the Sustain level (or full level if Decay = 0)
- Display: Alert shows
REL OFForREL {N}ms; OLED header V#:REL - Behavior differs by trigger mode:
- Non-looping voices (FWD, REV, FL2, FL3, ROLL): Release begins automatically the correct number of samples before the natural end of the sample play region — the voice fades out just as the sample finishes. If the Release duration is longer than the play region, it starts immediately at trigger time.
- Looping voices (LOOP, LPND): Release is deferred; the voice holds at the Sustain level indefinitely while looping. The release phase is triggered when an empty step is encountered for that voice in the sequencer — the voice then fades out over the set Release duration and stops. If Release = 0, a looping voice will loop indefinitely (until retriggered or the sequencer stops).
F1+B6: Voice EQ / Voice Filter Q (EQ / FLQ)
- Access: Press F1 + B6 to cycle between the two sub-modes:
- [1] VOICE EQ (EQ) → [2] VOICE FILTER Q (FLQ) → back to [1]
[1] Voice EQ (EQ)
- Purpose: Apply a per-voice DJ-style filter — low-pass (dark), bypass (flat), or high-pass (bright)
- Potentiometer: Sweeps the filter character:
- CCW half: Low-pass filter; deeper left = more bass-heavy rolloff
- Centre dead-band: Bypass — no filtering (FLAT); the pot snaps cleanly to bypass in this zone
- CW half: High-pass filter; deeper right = more treble-heavy rolloff
- Display: Shows LP x%, HP x%, or FLAT as the pot moves; alert shows EQ FLAT, LP x%, or HP x%
- Scope of assignment:
- No step held: Sets the per-voice default EQ and resets all steps of that voice to the same value
- Step button held: Sets an EQ override for that specific step only (stepEQ)
- F1 held: Records EQ automation to the currently playing step
- Saved: Per-voice EQ value stored in the pattern; step-level EQ overrides also saved
- Default: FLAT (bypass on fresh patterns)
[2] Voice Filter Q (FLQ)
- Purpose: Set per-voice resonance for the voice’s own low-pass filter
- Potentiometer: Adjust resonance (Q0%–Q100%)
- Nudge (F1+V1/V2): Step ±4%
- Effect: At low values the filter has a gentle rolloff; at high values it emphasises the cutoff frequency and can self-oscillate. Works in conjunction with the LFO target FLQ for dynamic resonance modulation
- LFO target: Exposed as the FLQ target in LFO TARGET mode (continuous modulation)
- Saved: Stored per-voice in the pattern
F1+B7: Trigger Mode (TRG)
- Purpose: Set per-step trigger type — controls playback direction, looping, and flam/roll multi-hit performance articulations, and arpeggiator pitch control
- Potentiometer: Selects one of 9 trigger types across equal ninths of the pot range
- Nudge shortcuts (F1+V1 / F1+V2): Step backward/forward through all 9 types one at a time
- Display: Shows TRG alert on entry; value feedback shows the mode label
| Pot position | Label | Behaviour |
|---|---|---|
| Leftmost (CCW) | FWD | Forward one-shot playback (default) |
| REV | Reverse one-shot playback | |
| LOOP | Loop sample region until next step retriggers the voice; use with a short or single-cycle waveform to turn it into a sustained oscillator | |
| LPND | Pendulum loop: bounces forward↔reverse between loop points; use with a short or single-cycle waveform for a smoother, phasing oscillator tone | |
| FL2 | Grace-note flam: 2 hits — main hit at full velocity + ghost note ~1.5 pulses later at 55% velocity | |
| FL3 | Open ruff: 3 hits spaced ~3.5 pulses apart, velocities descending 100% → 65% → 35% | |
| ROLL | Machine-gun roll: 4 evenly-spaced hits across ~¾ of a 16th note, all at 80% velocity | |
| ARP | Arpeggiator (one-shot): fires the voice once per arp step, pitched to the current global arpeggiator note | |
| Rightmost (CW) | LOOP ARP | Arpeggiator (looping): like ARP but loops the sample continuously, repitching each time the arp advances – required for short or single-cycle samples to sustain as notes |
Notes on REV and LPND modes:
- Samples longer than 4 seconds cannot be reversed or pendulum-played. If you try, the device will show SMPL TOO LONG on screen and fall back to forward playback.
- Using longer samples: switch to SL16 mode (Sample Play Mode → Sliced). In this mode each step plays only its own short slice of the sample, so reverse and pendulum work fine regardless of the total sample length.
Notes on flam/roll types:
- All timing intervals are tempo-relative — flam spacing automatically tightens at higher BPM
- A new step firing always cancels any in-flight flam hits for that voice
- Flam velocity layers are fixed and independent of per-step velocity (the base velocity scales all hits proportionally)
- LOOP and LPND modes require the sequencer to stop or retrigger the voice to end; flam/roll modes do not sustain
- Scope of assignment:
- F1 held: Applies to the currently playing step only (automation)
- Step button held: Applies to that specific step
- Neither held: Applies to all active steps for the current voice
- OLED Header: Voice pages use V#:MODE format (for example V1:TRG)
F1+B8: Condition (CON)
- Purpose: Set the trigger condition for each step — from always-on to probability-based to pattern-division logic
- Potentiometer: Selects one of 9 discrete conditions (fully clockwise = 100%, fully counter-clockwise = 1/4)
- Encoder: Step through conditions one at a time
- Display: Shows condition label on OLED (e.g. 100%, W/LST, 1/2)
| Pot position | Label | Behaviour |
|---|---|---|
| Fully CW (default) | 100% | Always triggers |
| 90% | 90% probability | |
| 75% | 75% probability | |
| 50% | 50% probability | |
| 25% | 25% probability | |
| 10% | 10% probability | |
| W/LST | Only triggers if the previous active step on this voice triggered | |
| 1/2 | Only triggers on the 1st of every 2 full pattern loops | |
| Fully CCW | 1/4 | Only triggers on the 1st of every 4 full pattern loops |
- Loop counters (1/2, 1/4) reset to zero when the sequencer is started or a new pattern is loaded, so these conditions always fire on the very first loop.
- Use Cases: Probabilistic fills, call-and-response sequences, slow-evolving patterns, and polyrhythmic layering
Per-Voice Step Division
Each voice can be set to advance its sequencer steps at 1/16, 1/8, or 1/4 of the master clock rate. This allows one voice to play a slow, leisurely pattern while another plays at the normal 16th-note grid.
- Access: Hold a Voice button (V1–V6) and press A1, A2, or A3
| Combo | Division | Steps per bar | Bars per 16-step pattern |
|---|---|---|---|
| V# + A1 | 1/16 (default) | 16 per bar | 1 bar |
| V# + A2 | 1/8 | 8 per bar | 2 bars |
| V# + A3 | 1/4 | 4 per bar | 4 bars |
- Saved: Step division is stored per-voice in the pattern
- Effect on live recording: The division divisor is applied during live event recording so recorded notes land on the correct subdivided step
- Tip: Set a bass voice to 1/4 and a hi-hat voice to 1/16 for easily composing across multiple bars in one 16-step pattern
Master Modes
These modes control global device parameters. Access using F8 + Step buttons:
F8+A1: Pattern Select (PATTERN SELECT)
- Purpose: Load/save sequencer patterns
- Step Buttons: Press A1-B8 to select pattern slot (short press = load, long press = save/manage)
- Long Press on an existing slot: Hold a green step button to open the action menu. Turn the pot to select one of three actions shown on the OLED, then press the same button to confirm (or any F-button to cancel):
- Replace (pot CCW): Save the current pattern over the selected slot. If the target slot belongs to a different song’s sample set, a secondary “OVR SMPLS?” prompt appears — press the same button again to proceed or any other button to cancel.
- Clear (pot centre): Delete the pattern file in the selected slot, returning it to empty.
- Copy (pot CW): Copy the selected pattern to another slot. After choosing Copy, long-press any empty destination slot to execute; slots that are already occupied show NOT EMPTY and are rejected.
- Long Press on an empty slot: Saves the current pattern directly to that slot (no action menu).
- Storage: 16 pattern slots per song, saved to SD card
- Voice Selection: Press V1-V6 to exit pattern select and return to voice modes
- LED Color Code: White = current pattern; Green = saved slot; Dim purple = empty slot; Orange blink = save target; 20% dimmed = currently playing step (if sequencer running)
- Load Guard: If the current pattern has unsaved changes, short-pressing a slot shows a “LOSE CHANGES?” confirmation screen. Press the same step button again to confirm the load (changes will be discarded), or press any other button / F-button to cancel and keep editing.
F8+A2: Song Select (SONG SELECT)
- Purpose: Switch between song arrangements
- Step Buttons: Press A1-B8 to select song (immediate selection)
- Long Press on an existing slot: Hold a green step button for 800 ms to open the action menu. Turn the pot to select an action, then press the same button to confirm (or any F-button to cancel):
- Clear (pot CCW): Delete all patterns in the selected song slot.
- Copy (pot CW): Copy the entire song to another slot. Long-press any empty destination slot to execute; occupied slots show NOT EMPTY.
- Range: 16 songs per bank
- Effect: Loads different set of patterns and samples
- LED Color Code: White = current song; Green = saved slot; Dim blue = empty slot; 20% dimmed = currently playing step (if sequencer running)
F8+A3: Bank Select (BANK SELECT)
- Purpose: Switch between sample banks
- Step Buttons: Press A1-B8 to select bank (immediate selection)
- Long Press on an existing slot: Hold a green step button for 800 ms to open the action menu. Turn the pot to select an action, then press the same button to confirm (or any F-button to cancel):
- Clear (pot CCW): Delete all songs and patterns in the selected bank.
- Copy (pot CW): Copy the entire bank to another slot. Long-press any empty destination slot to execute; occupied slots show NOT EMPTY.
- Range: 16 banks available
- Effect: Changes which songs and patterns are active
- LED Color Code: White = current bank; Green = saved slot; Dim red = empty slot; 20% dimmed = currently playing step (if sequencer running)
F8+A4: Song Sequencer (SONG SEQ)
The Song Sequencer lets you chain patterns into a full song arrangement — up to 128 steps per song, each step playing one full pattern. The actual bar length of a step depends on the assigned pattern’s step division: a pattern with 1/16 steps and 16 active steps is 1 bar; the same 16 steps at 1/4 is 4 bars.
Overview
- Steps: 128 song steps per song, numbered 1–128
- Pattern assignment: Each step can be assigned any of the 16 saved pattern slots (A1–A8 = patterns 1–8; B1–B8 = patterns 9–16), or left unassigned
- Inheritance: An unassigned step automatically plays the pattern from the nearest preceding assigned step (shown in lowercase on the display). This lets you repeat sections without explicitly assigning every step.
- Skipped steps: If a step is unassigned and has no preceding assigned step to inherit from, it is silently skipped
- Auto-save: Any change to the song sequence is saved to SD immediately
- Access: Press F8 + A4 while in PATTERN_SELECT, SONG_SELECT, or BANK_SELECT mode
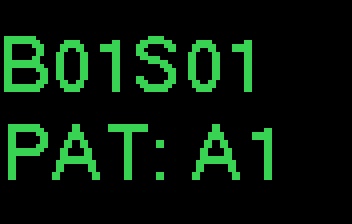
Layout & Display
The OLED shows two rows of four cells per page (8 song steps per page, 16 pages total):
B01S01              1/16
+----+----+----+----+
| A2 | a2 |[A3]| a3 |
+----+----+----+----+
| a3 | B5 | b5 | B5 |
+----+----+----+----+Note: placing a second pattern of the same type in succession (eg. the second uppercase B5 in the 2nd row above) loops back to the beginning of the song sequence.
- Header: Current Bank (B##) and Song (S##), and current page (##/16)
- Uppercase cell labels (e.g. A3, B5): explicitly assigned pattern — plays that pattern
- Lowercase labels (e.g. a3, b5): step inherits the pattern from the preceding assigned step
- —: unassigned with no preceding assigned step to inherit from — this step is skipped
- Double border around a cell: that song step is currently selected (cursor)
- Filled 3×3 square in the bottom-right of a cell: that song step is currently playing (sequencer running)
Controls
| Control | Action |
|---|---|
| Pot | Navigate song steps (full sweep = all 128 steps) |
| A1–A8 | Assign pattern slot 0–7 to selected song step (press again to unassign; step then inherits) |
| B1–B8 | Assign pattern slot 8–15 to selected song step (press again to unassign; step then inherits) |
| F1 + V1 | Nudge cursor one song step left |
| F1 + V2 | Nudge cursor one song step right |
| F8 (single) | Toggle sequencer play / stop |
| F8 (double-tap) | Rewind to step 1 (works stopped or playing) |
| F8 + Pot | Adjust master volume |
| V1–V6 | Exit Song Sequencer → return to PATTERN_SELECT |
Workflow
- Save your patterns first — patterns must be saved to slots to be assignable (use PATTERN_SELECT long-press to save)
- Select a song step using the pot or F1+V1/V2 nudge
- Assign a pattern by pressing a step button (A1–A8 for slots 0–7; B1–B8 for slots 8–15)
- Move to the next song step and repeat
- Press F8 to play the song from the selected step
- Press F8 double-tap at any time to rewind to step 1
Tips
- Use inheritance (leave steps unassigned) to repeat sections without re-assigning; change one assigned step and all following unassigned steps automatically inherit the new pattern
- Each song step plays one full pattern cycle before advancing — the actual bar length depends on the pattern’s step division (e.g. 16 steps at 1/4 = 4 bars per song step)
- MIDI clock sync works inside the Song Sequencer; step advances happen at pattern boundaries
- Switching songs (SONG_SELECT) resets the song sequence and playback position
OLED feedback
- While the song sequencer is playing, a blinking ▶ play icon appears in the top-right corner of the display on every screen — confirming that song sequence mode is active regardless of which mode you navigate to
- The icon blinks while the sequencer is running and disappears when stopped or paused
F8+A5: Pattern Bounce (BOUNCE PATTERN)
Renders the current pattern offline to a loopable WAV file on SD card, then automatically imports it into a chosen sample slot.
How to Bounce
- Enter Bounce Mode — press F8 + A5 (hold F8, then tap A5 while the sequencer is stopped or playing)
- Select target sample slot — hold any Step button (A1–B8) to choose the destination sample slot (1–16)
- Confirm — hold the chosen step button until the progress screen appears
- The OLED shows a progress bar while the pattern renders offline (the device is unresponsive during this time)
- On completion, the bounced file is automatically imported into the chosen slot and the device returns to normal operation
Specifications
- Output file: Stereo WAV saved to
/SAMPLES/BOUNCED/on SD card - FX tail stitching: ~62 ms of reverb/delay tail is blended into the loop start so the sample loops cleanly
- Level: Output level is automatically boosted to match normal playback volume
- Voice mask: Only non-muted voices are included in the bounce
- Blocking: The device is unresponsive to input while rendering; a progress bar is shown on screen
Notes
- The WAV file is permanently retained on SD card after import — it can be reloaded or used externally
- Bounced files are stereo on SD but the playback copy is always mono
- Long patterns or slow tempos produce larger files and longer render times
F8+A6: Pattern Length (LEN)
- Purpose: Set active sequencer length
- Potentiometer: Adjust pattern length
- Range: 1–16 steps
- Nudge (F1+V1/V2): Step ±1
- Default: 16 steps
- Effect: Sequencer loops after the specified step count
F8+A7: Swing (SWG)
- Purpose: Add shuffle/swing timing to sequencer
- Potentiometer: Adjust swing amount
- Range: 0–100% (0 = straight, 100 = maximum triplet swing)
- Nudge (F1+V1/V2): Step ±1%
- Effect: Delays alternate (upbeat) steps for groove feel
F8+A8: BPM Set (BPM)
- Purpose: Set sequencer tempo
- Potentiometer: Adjust tempo (full sweep = 30–240 BPM)
- Range: 30–240 BPM (beats per minute)
- Nudge (F1+V1/V2): Step ±1 BPM
- Display: Shows current BPM value
F8+B1: Scale Type / Scale Root (SCLT / SCLR)
- Access: Press F8 + B1 to cycle between the two scale sub-modes:
- [1] SCALE TYPE → [2] SCALE ROOT → back to [1]
- These settings define the global musical scale used by the arpeggiator (see F8+B2 Arpeggiator)
[1] Scale Type (SCLT)
- Purpose: Set the global musical scale
- Potentiometer: Sweep through 22 scale options; display shows the scale name
- Nudge (F1+V1/V2): Step ±1
- Saved: Stored in device settings (persists across power cycles)
| Index | Display Name | Type |
|---|---|---|
| 0 | Major | 7-note diatonic |
| 1 | Minor | 7-note melodic minor |
| 2 | Min Harm | 7-note harmonic minor |
| 3 | Penta Maj | 5-note pentatonic major |
| 4 | Penta Min | 5-note pentatonic minor |
| 5 | Blues Hex | 6-note blues hexatonic |
| 6 | Blues Hept | 7-note blues heptatonic |
| 7 | Maj Triad | 3-note major triad |
| 8 | Min Triad | 3-note minor triad |
| 9 | Major 7th | 4-note major seventh |
| 10 | Minor 7th | 4-note minor seventh |
| 11 | Raga Bhairav | 7-note Indian raga |
| 12 | Spanish | 8-note Spanish/Phrygian dominant |
| 13 | Romani | 7-note Romani/double harmonic |
| 14 | Arabian | 7-note Arabian |
| 15 | Egyptian | 5-note Egyptian |
| 16 | Hawaiian | 5-note Hawaiian |
| 17 | Bali Pelog | 5-note Balinese Pelog |
| 18 | Miyakobushi | 5-note Japanese Miyakobushi |
| 19 | Ryukyu | 5-note Okinawan Ryukyu |
| 20 | Wholetone | 6-note whole tone |
| 21 | Chromatic | All 12 semitones (no filtering) |
[2] Scale Root (SCLR)
- Purpose: Set the tonic/root note for all scale-relative pitch computations
- Potentiometer: Select root MIDI note (0–127); middle C = MIDI 60
- Nudge (F1+V1/V2): Step ±1
- Effect: Transposes all arpeggiator pitches in real time
- Saved: Stored in device settings
F8+B2: Arpeggiator (ARP TYPE / ARP LENGTH / ARP RATE)
The MYNAH arpeggiator is a single global engine that automatically cycles through a series of scale-relative pitches. Any voice step whose trigger mode is set to ARP or LOOP ARP (see F1+B7 Trigger Mode) will be pitched to the current arpeggiator note each time it fires.
- Access: Press F8 + B2 to cycle through the three arp parameters:
- [1] ARP TYPE → [2] ARP LENGTH → [3] ARP RATE → back to [1]
- The arpeggiator runs continuously alongside the sequencer, advancing at its own rate independently of the step grid; it resets to step 0 when the sequencer restarts, a new pattern loads, or a MIDI Start message is received
- Pitch is computed at playback — not stored — so changing scale, root, or arp settings affects all previously recorded arp steps in real time
[1] Arp Type (ART)
- Potentiometer: Sweep through 7 arp patterns; display shows the label
- Default:
UP(type 0) - Nudge (F1+V1/V2): Step ±1 (wraps)
| Index | Label | Behaviour |
|---|---|---|
| 0 | UP | Ascend: degree 0, 1, 2 … L−1, then repeat |
| 1 | DOWN | Descend: degree L−1, L−2 … 0, then repeat |
| 2 | UP/DN | Ascend then descend without repeating the endpoints |
| 3 | UP+8 | Two-octave ascending: first pass in root octave, second pass one octave up |
| 4 | RND | Random: picks a new random scale degree each arp step |
| 5 | SKIP | Skip-up: interleaves degrees — 0, 2, 1, 3, 2, 4 … for a zig-zag ascending feel |
| 6 | CONV | Converge: alternates outermost and innermost degrees — 0, L−1, 1, L−2, 2, L−3 … |
Note: There is no arp “OFF” type — to silence the arpeggiator, set voice trigger modes away from ARP / LOOP ARP.
[2] Arp Length (ARL)
- Potentiometer: Select number of scale degrees in one arp cycle (1–16)
- Default: 4
- Nudge (F1+V1/V2): Step ±1 (wraps between 1 and 16)
[3] Arp Rate (ARR)
- Potentiometer: Select how quickly the arp advances relative to sequencer tempo; display shows the label
- Default:
1/16(rate 2 — matches sequencer step grid) - Nudge (F1+V1/V2): Step ±1 (wraps)
All rates are tempo-relative:
| Index | Label | Speed |
|---|---|---|
| 0 | 1/4 | 1 note per beat |
| 1 | 1/8 | 2 notes per beat |
| 2 | 1/16 | 4 notes per beat (matches sequencer step grid) |
| 3 | 1/4T | Quarter-note triplet |
| 4 | 1/8T | Eighth-note triplet |
| 5 | 1/16T | Sixteenth-note triplet |
| 6 | 1/2 | Half note (1 note every 2 beats) |
Using the Arpeggiator
- Select a voice (V1–V6)
- Set one or more steps to ARP or LARP using F1+B7 (Trigger Mode)
- Enable those steps normally (press step buttons in step-entry mode) and assign a sample
- Set the arp type, length, and rate using F8+B2
- Set the scale and root note using F8+B1
- Press F8 to start the sequencer — enabled steps will play through the arp cycle
Tip — LOOP ARP for sustained tones: Assign a short single-cycle or tonal sample to a voice, set trigger mode to LOOP ARP (LARP), and enable several steps. Each step loops the sample and retriggers at the arp rate with a new pitch, creating a smooth arpeggiated melody.
Tips
- Layer voices on the same arp: Assign arp trigger mode to steps across several voices with different samples for rich polyphonic arpeggios
- Stagger arp rates: Use
1/8on voice 1 and1/16Ton voice 2 for polyrhythmic textures - Per-step pitch offset: Use F1+A2 (PTC) to add a semitone offset to individual arp steps
- Arp + conditions: Combine ARP steps with step conditions (F1+B8) for probabilistic melodic phrases
- Transpose live: Change the scale root (F8+B1) while the sequencer is running to instantly transpose the entire arp in real time
F8+B3: Master Filter (FILTER CUTOFF / FILTER Q)
- Access: Press F8 + B3 to cycle between the two filter sub-modes:
- [1] FILTER CUTOFF → [2] FILTER Q → back to [1]
[1] Filter Cutoff (FLC)
- Purpose: Set master low-pass filter cutoff frequency applied across the entire mix
- Potentiometer: Adjust cutoff frequency
- Range: 50–16000 Hz
- Nudge (F1+V1/V2): Steps through the frequency range
- Effect: Rolls off frequencies above the cutoff across all voices
[2] Filter Q (FLQ)
- Purpose: Set filter resonance / sharpness
- Potentiometer: Adjust Q factor (0–100%)
- Nudge (F1+V1/V2): Step ±5
- Effect: Emphasises frequencies at the cutoff; can self-oscillate at extreme values
F8+B4: Delay (DELAY TIME / DELAY SYNC / DELAY MIX)
- Access: Press F8 + B4 to cycle through the three delay sub-modes:
- [1] DELAY TIME → [2] DELAY SYNC → [3] DELAY MIX → back to [1]
[1] Delay Time (DLY)
- Purpose: Set delay repeat timing in milliseconds
- Potentiometer: Adjust delay time
- Range: 20–999 ms
- Nudge (F1+V1/V2): Step ±10 ms
- Effect: Controls the timing of delay repeats
[2] Delay Sync (DSY)
- Purpose: Lock delay time to a musical tempo division, automatically tracking the current BPM
- Potentiometer: Select sync division (8 options)
- Nudge (F1+V1/V2): Step through divisions
- Effect: Delay time is computed from the current BPM; changing BPM updates the delay time automatically
- Entry: When cycling from DELAY TIME into DELAY SYNC, the current delay time is snapped to the nearest matching tempo division
| Label | Division |
|---|---|
| T16 | 16th-note triplet |
| 16 | 16th note |
| T8 | 8th-note triplet |
| 8 | 8th note |
| D8 | Dotted 8th |
| Q | Quarter note |
| DQ | Dotted quarter |
| HALF | Half note |
[3] Delay Mix (DLM)
- Purpose: Balance between dry and delayed signal
- Potentiometer: Adjust wet/dry mix
- Range: 0–100%
- Nudge (F1+V1/V2): Step ±5 (≈2%)
- Effect: 0% = no delay heard; 100% = only delay heard
F8+B5: Reverb (REVERB SIZE / REVERB DAMP / REVERB_ON_TAILS)
- Access: Press F8 + B5 to cycle through the three reverb sub-modes:
- [1] REVERB SIZE → [2] REVERB DAMP → [3] REVERB ON TAILS → back to [1]
[1] Reverb Room Size (RVS)
- Purpose: Control reverb space simulation size
- Potentiometer: Adjust room size
- Range: 0–100%
- Nudge (F1+V1/V2): Step ±5 (≈2%)
- Effect: Larger values create longer reverb tail
[2] Reverb Damping (RVD)
- Purpose: Control high-frequency absorption in reverb
- Potentiometer: Adjust damping
- Range: 0–100%
- Nudge (F1+V1/V2): Step ±5 (≈2%)
- Effect: Higher values remove more brightness from reverb tail
[3] Reverb on Tails (RVT)
- Purpose: Route delay return signal into the reverb input
- Potentiometer: Adjust send amount
- Range: 0–100% (0 = off)
- Nudge (F1+V1/V2): Step ±5 (≈2%)
- Effect: As the value is raised, delay echoes are also processed by the reverb, adding spaciousness and wash to the tail. This is a global routing — not per-voice.
- Saved: Stored in song.dat alongside the other reverb parameters
F8+B6: Bit Crusher / Vinyl Sim (BITCRUSH / VINYL SIM)
- Access: Press F8 + B6 to cycle between the two effects:
- [1] BITCRUSH → [2] VINYL SIM → back to [1]
[1] Bit Crusher (BCR)
- Purpose: Add digital lo-fi degradation to the master mix
- Potentiometer: Adjust bit depth reduction
- Range: 0 (off) to 15 (maximum crush)
- Nudge (F1+V1/V2): Step ±1
- Effect: 0 = no effect; 15 = maximum lo-fi degradation
- Sound: Crunchy, grainy, digital character
- Automation: Recordable as a master automation lane (V1 + potentiometer in master lane mode)
[2] Vinyl Sim (VNL)
- Purpose: Mix a looping vinyl crackle and surface noise sample into the master output
- Potentiometer: Adjust noise level (0–100%)
- Effect: At 0% the effect is off. As the level rises, looping vinyl noise is mixed in. Above ~30% a gentle LPF also rolls off the high end for a more authentic vinyl character
- Saved: Stored per song in song.dat (persists with the song)
F8+B7: Master Compressor (COMP DRIVE / COMP SPEED / COMP SIDECHAIN)
A glue-style master compressor applied at the final stage of the signal path (before master volume), inspired by the EP-133 K.O. II compressor. Press F8 + B7 to cycle:
- [1] COMP DRIVE → [2] COMP SPEED → [3] COMP SIDECHAIN → back to [1]
Bypass: Set COMP DRIVE to 0 to bypass the compressor entirely (zero CPU overhead when bypassed).
[1] Comp Drive (DRV)
- Purpose: Combined input gain and auto-makeup — controls how hard the signal is pushed into the compressor
- Potentiometer: 0–100% (0 = bypassed)
- Nudge (F1+V1/V2): Step ±5
- Effect: Raises input gain up to 4× at maximum. Auto-makeup compensates for the compression, giving the characteristic “squash and glue” sound
[2] Comp Speed (SPD)
- Purpose: Attack/release macro — controls the compressor’s response speed
- Potentiometer: 0–100%
- Nudge (F1+V1/V2): Step ±5
- Effect: 0 = slow (smooth, transparent levelling); 100% = fast (pronounced pumping and transient snap)
- Default: 50% (medium speed)
[3] Comp Sidechain (SC)
- Purpose: Select the gain-reduction trigger source
- Potentiometer: OFF, V1–V6
- Options:
- OFF = audio-level detection (normal compressor mode)
- V1–V6 = ghost sidechain from Voice 1–6: note-on events from the chosen voice instantly trigger compression even when that voice is muted — creates a classic pumping/ducking effect
- Default: OFF (audio detection)
- Saved: Compressor settings are saved with each pattern
F8+B8: Master Volume (VOL)
- Purpose: Set overall output volume
- Potentiometer: Adjust master volume
- Range: 0-100%
- Effect: Controls overall device output level
- Note: Also accessible via F8 + Potentiometer shortcut from any mode
- Saved: Stored in device settings (persists across power cycles); not saved per-pattern and cannot be automated — the value set here is global and is unaffected by pattern changes or song playback
Master FX Modes (Special Toggle Modes)
These are special effect modes that work differently from other modes. They are toggled on/off using F1 combos and use step buttons to select patterns while active:
F1+V3: Gater (GTR)
- Access: F1 + V3 (toggle on/off)
- Purpose: Rhythmic gating effect that mutes/unmutes audio in patterns
- Step Buttons (while active): Press and hold A1-B8 to select gating pattern
- Display: Shows “GTR” mode name
- Pot: Controls gate wetness (dry/wet blend)
A-row patterns (A1-A8, indices 0-7) — Gate shapes only:
| Button | Pattern | Description |
|---|---|---|
| A1 | 32nd Note Gate | Standard alternating open/close |
| A2 | 16th Note Gate | Slower gate chop |
| A3 | 64th Note Trill | Very fast open/close trill |
| A4 | Gallop 64ths | Three-pulse gallop feel |
| A5 | Machine Gun 64ths | Rapid single-pulse hits |
| A6 | Single 64th per beat | One click per bar half |
| A7 | Drop Last 32nd | Full on except last pulse |
| A8 | Cut Middle | Silent in the middle of each beat |
B-row patterns (B1-B8, indices 8-15) — Gate + delay/reverb boost:
All B-row patterns apply 100% of the gated signal into the delay send bus on every gate-open step, so the delay line captures the gate rhythm and the tail rings out freely after each chop (classic trance-gate echo effect). Each pattern also has a unique reverb routing:
| Button | Gate Pattern | Delay | Reverb Character |
|---|---|---|---|
| B1 | Swing-ish 64ths | 100% | None — swinging echo tail only |
| B2 | Skip 64ths | 100% | None — stuttering skip echo |
| B3 | Offbeat 64ths | 100% | 80% constant — offbeat ghost echo |
| B4 | Glitch A | 100% | 60% constant — glitchy space echo |
| B5 | Complexity 1 | 100% | 100% on bar first-half (steps 0-15) |
| B6 | Complexity 2 | 100% | 100% alternating every 4 steps |
| B7 | Complexity 3 | 100% | 100% constant — full wet chaos |
| B8 | Pattern 15 | 120% | 100% constant — saturated maximum |
F1+V4: Filter (FLT)
- Access: F1 + V4 (toggle on/off)
- Purpose: Rhythmic filter sweeping synchronized to the sequencer
- Step Buttons (while active): Press and hold A1-B8 to select filter pattern
- Display: Shows “FLT” mode name
- Pot: Controls filter resonance
A-row patterns (A1-A8, indices 0-7) — LFO cutoff sweeps only (no delay/reverb boost):
| Button | LFO Shape | Cutoff Range |
|---|---|---|
| A1 | Triangle | Slow sweep, 400–3500 Hz |
| A2 | Sawtooth rise | Rising sweep |
| A3 | Reverse sawtooth | Falling sweep |
| A4 | Slow pulse | Wide slow pulse |
| A5 | Fast pulse | Rapid pulse |
| A6 | Stepped rise | Stair-step up |
| A7 | Stepped fall | Stair-step down |
| A8 | Sine-ish | Smooth rounded sweep |
B-row patterns (B1-B8, indices 8-15) — Same LFO shapes as A-row + delay/reverb boost:
All B-row patterns inject 100% of the filtered master signal into the delay send bus, adding a rhythmically-sweeping echo. Reverb routing follows the LFO shape:
| Button | LFO Shape | Delay | Reverb Character |
|---|---|---|---|
| B1 | Triangle | 100% | 100% on falling half (steps 16-31) |
| B2 | Sawtooth rise | 100% | 100% on upper sweep (steps 16-31) |
| B3 | Rev sawtooth | 100% | 100% on first half (steps 0-15) — high filter into reverb |
| B4 | Slow pulse | 100% | 100% constant — massive slow wash |
| B5 | Fast pulse | 100% | 100% alternating every 2 steps — rapid pulse reverb |
| B6 | Stepped rise | 100% | 100% on top two levels (steps 16-31) |
| B7 | Stepped fall | 100% | 80% constant — filter descends into reverb |
| B8 | Sine-ish | 120% | 100% constant — saturated maximum |
F1+V5: Phase (PHA)
- Access: F1 + V5 (toggle on/off)
- Purpose: Modulation effects (phaser/chorus/flanger) for stereo width and movement
- Step Buttons (while active): Press and hold A1-B8 to select modulation pattern
- Display: Shows “PHC” mode name
- Pot: Controls modulation depth
A-row patterns (A1-A8, indices 0-7) — Modulation LFO shapes only (no delay/reverb boost):
| Button | Modulation Shape | Character |
|---|---|---|
| A1 | Triangle | Smooth symmetric sweep |
| A2 | Sawtooth rise | Ascending pitch ramp |
| A3 | Reverse sawtooth | Descending pitch ramp |
| A4 | Slow pulse wah | Wide slow wah |
| A5 | Fast pulse wah | Rapid wah |
| A6 | Stepped rise | Stair-step pitch up |
| A7 | Stepped fall | Stair-step pitch down |
| A8 | Sine-ish | Rounded smooth modulation |
B-row patterns (B1-B8, indices 8-15) — LFO-modulated chorus using the chorus buffer (32 ms @ 32 kHz) + delay/reverb boost + per-pattern momentary bit reduction:
All B-row patterns inject the master signal into the delay send bus. Each pattern has a distinct LFO rate/shape and chorus depth window. Reverb routing and bit-crush trigger complement each chorus character:
| Button | Chorus Character | Delay | Reverb | Bit Crush |
|---|---|---|---|---|
| B1 | Very slow sine, 0.08 Hz (8–25 ms) | 100% | 100% on rising half (steps 0-15) — swell opens with reverb | 5-bit crush on downbeats |
| B2 | Medium sine, 0.25 Hz (6–20 ms) | 100% | None — clean chorus echo | 6-bit crush on offbeats |
| B3 | Fast sine, 1.0 Hz (5–15 ms) | 100% | 80% constant — shimmer into space | 7-bit crush every 4 steps |
| B4 | Very slow triangle, 0.06 Hz (8–28 ms) | 100% | 100% constant — dreamy giant wash | 8-bit crush on downbeat only |
| B5 | Medium triangle, 0.4 Hz (6–22 ms) | 100% | 100% alternating every 2 steps — rhythmic reverb swell | 5-bit crush on first bar-half |
| B6 | Fast triangle, 1.5 Hz (5–18 ms) | 100% | 100% on top two levels (steps 16-31) — vibrato into reverb | 7-bit crush on 2-step pulse each beat |
| B7 | Slow wide sine, 0.12 Hz (8–28 ms) | 100% | 80% constant — lush pad into space | 9-bit crush on upbeat portion |
| B8 | Fast aggressive, 2.0 Hz (5–14 ms) | 120% | 100% constant — saturated maximum | 10-bit hard crush on each beat |
F1+V6: Retrig FX (RTR)
- Access: F1 + V6 (toggle on/off)
- Purpose: Tempo-synced retrigger patterns — fires additional note hits within the same step using the flamQueue, creating rolls, stutters, and rhythmic effects without touching the audio buffer
- Step Buttons (while active): Press and hold A1-B8 to select retrigger pattern
- Display: Shows “RTR” mode name
- Pot: Controls the volume of retriggered hits — maps to 30–100% of the original step velocity (pot at minimum = 30%, pot at maximum = 100%). Applies to all retrig patterns. Natural per-hit velocity decay (×0.8 per hit) still applies on top of this level, creating an organic trailing roll.
- Priority: Step-level flam and roll trigger modes take precedence — Retrig FX is bypassed for any step that already uses TRIG_FLAM_2, TRIG_FLAM_3, or TRIG_ROLL
A-row patterns (A1-A8, indices 0-7) — Retrigger only:
| Button | Pattern | Extra Hits | Interval | Description |
|---|---|---|---|---|
| A1 | 2× 1/32 | 1 | ½ step | One extra hit at half-step — classic double |
| A2 | 3× triplet | 2 | ⅓ step | Two extra hits at triplet spacing |
| A3 | 4× 1/64 | 3 | ¼ step | Three rapid extra hits — fast stutter |
| A4 | 2× dotted 1/32 | 1 | ⅔ step | Dotted-rhythm extra hit — swinging double |
| A5 | Even-step double | 1 | ½ step | Extra hit only on even steps |
| A6 | 6× fast roll | 5 | ~1/96 | Five extra hits — dense fast roll |
| A7 | 8× drum roll | 7 | ~1.5 pulses | Seven extra hits — very dense roll |
| A8 | Downbeat double | 1 | ½ step | Extra hit only on quarter-note steps |
B-row patterns (B1-B8, indices 8-15) — Same retrigger shapes as A-row + delay/reverb boost + radical stereo panning:
All B-row patterns add 100% of the master signal to the delay send bus. Reverb routing gives each pattern a unique spatial character. In addition, B-row retrig extra hits are panned hard left or right on selected steps — the initial hit plays at its original pan (providing a centre anchor) while the rapid-fire echoes snap to one side, creating a stereo ping-pong roll effect.
Stereo spread detail: Each B sub-pattern has its own step spacing (1-in-4 to 1-in-8) that determines how often panning occurs. Per-voice offsets stagger the panning cascade so that different voices snap to opposite sides on different steps rather than all moving at once. Direction alternates (L → R → L) per period and per voice for a balanced stereo spread across the bar.
| Button | Retrigger Shape | Delay | Reverb | Pan Spacing |
|---|---|---|---|---|
| B1 | 2× 1/32 | 100% | None — clean double echo | Every 4 steps |
| B2 | 3× triplet | 100% | 100% on first half (steps 0-15) — opens with reverb | Every 8 steps |
| B3 | 4× 1/64 | 100% | 80% constant — dense stutter into space | Every 6 steps |
| B4 | 2× dotted | 100% | 100% constant — spacious swing echo | Every 5 steps |
| B5 | Even-step double | 100% | 100% alternating every 2 steps — rhythmic reverb emphasis | Every 7 steps |
| B6 | 6× fast roll | 100% | 100% on second half (steps 16-31) — roll launches into reverb | Every 4 steps |
| B7 | 8× drum roll | 100% | 80% constant — saturated roll wash | Every 5 steps |
| B8 | Downbeat double | 120% | 100% constant — maximum beat emphasis | Every 6 steps |
Note on Master FX Usage:
- Master FX modes operate independently of voice modes
- While in a Master FX mode, step buttons control effect patterns instead of sequencer steps
- Press F1 + the same F-key again to toggle the effect off
- Effects remain active until explicitly turned off
- No step button selected = effect bypassed automatically
- A-row (A1-A8): Core FX effect only
- B-row (B1-B8): Core FX effect plus delay and reverb send boost — ensure delay and/or reverb are enabled (non-zero mix) to hear the full effect
Special Modes
Recording Mode (REC)
- Access: F1 + F8 (from voice modes 0-15 and navigation modes; blocked from other master parameter modes)
- Purpose: Record new samples from microphone or line-in
- Input Selection: Use the slide switch located on the right side of the device
- Shows “REC:MIC” for microphone input
- Shows “REC:LIN” for line-in input
- Recording Workflow (MIC and LIN):
- Connect your source:
- Built-in mic: leave line input disconnected or inactive.
- Line input: connect your external source to LINE IN and start playback.
- Press F1 + F8 to enter REC_MODE.
- Confirm source on OLED:
- REC:MIC = built-in mic selected
- REC:LIN = line input selected
- Hold a destination Step button (A1-B8) for about 200 ms to arm recording to that sample slot.
- Wait through the automatic count-in (default 4 beats, tempo follows current BPM). Set to 0 for an immediate start.
- Recording starts and latches (you do not need to keep holding the step button).
- Press any button to stop recording.
- The take is written to SD, imported into the selected slot, and REC_MODE exits back to the previous mode.
- Adjusting Count-In Length: While on the REC_MODE page (before arming a slot), turn the pot to set the count-in from 0 to 8 beats. The display shows
Count-inwith the selected number. This setting is saved to device settings and persists across power cycles. - Exit (without recording): In REC_MODE standby (not recording), press any F-key (F1-F8) to cancel and return
- Maximum Duration: ~20 seconds (mic mono) or ~10 seconds (line stereo)
- Levels: Real-time input level display on OLED
- Note: REC_MODE can be entered from voice modes and navigation modes (PATTERN/SONG/BANK/SONG_SEQUENCE), but not from other master parameter modes
- Auto-load Note: When recording stops, the new take is automatically imported into the selected sample slot and set as the current voice’s default sample
- See Recording Audio section for more details
Live Play Mode
- Access: F8 + V6 (global toggle — survives voice switches)
- Purpose: Turn the 16 step buttons into a real-time instrument for live performance — either a chromatic keyboard or a multi-pad drum trigger
- Exit: F8 + V6 again; display shows STEP when returning to normal step-edit mode
When live play is enabled, the active sub-mode is determined automatically by the current voice’s sample play mode (the one set with F1 + B3):
| Voice sample play mode | Live sub-mode | Alert shown |
|---|---|---|
| SINGLE | Keyboard | KEYBOARD |
| SL 16 or SL TRS | Drum Pad | PAD MODE |
Switching voices while live play is active re-evaluates the sub-mode instantly, so you can flip between keyboard and pad behaviour by selecting a different voice.
Keyboard Mode (voice sample play mode = SINGLE)
- The 16 step buttons form a two-octave chromatic layout centred on the voice’s default pitch:
- A1–A8: −8, −7, −6, −5, −4, −3, −2, −1 semitones (lower octave, left to right)
- B1–B8: 0, +1, +2, +3, +4, +5, +6, +7 semitones (upper octave, B1 = root pitch)
- Each press immediately triggers the voice’s default sample at the corresponding transposed pitch
- Velocity is derived from the voice volume setting
Drum Pad Mode (voice sample play mode = SL 16 or SL TRS)
- Each step button directly fires the corresponding slice (button 1 → slice 0, button 2 → slice 1, …)
- For SL 16: button index maps directly to one of the 16 equal slices
- For SL TRS: button index is clamped to the number of detected transient slices
- Velocity is derived from the voice volume setting
- Useful for playing drum hits, chops, or any multi-sample mapped to a single sliced sample
Tips
- Combine Keyboard Mode with pitch/tuning to shift the root note before entering live play
- Use Drum Pad Mode on a transient-sliced drum loop to improvise fills over the running sequencer
- The sequencer keeps running in live play mode — triggered notes layer on top of the pattern
- Use voice mute (double-tap V1–V6) to silence a sequencer voice while jamming live through a different voice
Live Recording
While in live play mode you can record your performance directly into the running pattern in real time.
- Start recording: Double-tap F1 while in live play mode (the sequencer must be running). The alert REC ON is shown and a blinking dot appears next to the mode icon on the OLED.
- Stop recording: Double-tap F1 again. Alert shows REC OFF.
- Cancel immediately: Press any F-button (F1–F8). Cancels without a second double-tap.
- Requirement: The sequencer must be playing. If it is paused when you double-tap F1, the alert SEQ OFF is shown and recording does not start.
What gets written
Each time you press a step button while live recording is active, the current sequencer step is written with that note’s data:
| Sub-mode | Data stamped into the step |
|---|---|
| Keyboard | Step activated with the voice’s default sample; pitch offset set to the semitone of the key you pressed |
| Drum Pad | Step activated with the voice’s default sample; slice index locked to the pad you pressed (1-based) |
The pattern is updated immediately and marked as modified. The sequencer continues to play — on the next loop the newly recorded steps will fire in the normal playback pass.
OLED feedback
- A blinking middle-dot appears to the left of the mode icon (grid/note) on line 2 while recording is active
- If the live-play preview screen is open (F8 held), a small REC label is shown at the bottom
Tips
- Record fills or variations over a running groove without stopping the sequencer
- Switch voices mid-recording to layer material across multiple voices in one take
- The sequencer keeps cycling — a step is only overwritten when you press the corresponding pad or key, so unplayed steps are left intact
- Erase unwanted steps afterwards in normal step-entry mode (toggle them off)
Advanced Features
Recording Audio
Record Modes
- Microphone Recording: Direct from built-in microphone
- Line-In Recording: From external audio source via line input
Input Detection
- Automatic Detection: Device automatically detects which input source is active
- Display Indication: Shows “REC:MIC” or “REC:LIN” on OLED when entering recording mode
Recording Process
- Enter Recording Mode
- Press F1 + F8 to enter REC_MODE
- You can enter from voice modes and navigation modes (PATTERN/SONG/BANK/SONG_SEQUENCE)
- Display shows REC:MIC (built-in mic) or REC:LIN (line input)
- Note: REC_MODE entry is blocked from other master parameter modes
- Choose Source and Destination Slot
- For MIC: keep line input disconnected/inactive
- For LINE: connect your external source and start playback
- Hold the destination Step button (A1-B8) for about 200 ms
- Adjust Count-In Length (Optional)
- While on the REC_MODE page (before arming a slot), turn the pot to set the count-in length from 0 to 8 beats
- The OLED shows
Count-inwith the number centred below - 0 beats = recording starts immediately on slot arm (no countdown)
- The setting is saved to device settings and persists across power cycles
- Wait for Count-In, Then Record
- The count-in starts automatically after arming a slot (timed to current BPM)
- Recording starts on the downbeat and latches (no need to keep holding the step button)
- Sequencer pauses during recording and resumes to its previous state when recording ends
- Stop Recording
- Press any button to stop the active recording
- Recording is saved to SD, imported to the selected sample slot (1-16), and REC_MODE exits
- The current voice is redirected to the recorded slot so you can audition immediately
- Exit Without Recording
- In REC_MODE standby (not recording), press any F-key (F1-F8) to cancel and return
- No recording is saved
Recording Specifications
- Channels: Mono (microphone) or Stereo (line-in)
- Maximum Duration: ~20 seconds (mic mono) or ~10 seconds (stereo line-in)
- Total Sample Storage: ~2 minutes across all 16 slots
- Files saved to: /SAMPLES/RECORDINGS/ on SD card
- Auto-load: After you stop recording, the new take is automatically loaded into the selected slot for immediate playback
Tips for Best Results
- For microphone: Speak/play clearly at a consistent distance
- For line-in: Set source output to moderate level to avoid clipping
- Hold the destination step only long enough to arm recording; after count-in, recording is latched
- Keep recordings under 20 seconds for best performance
- Samples are automatically normalized on import
Utility Operations (F8 + V1–V2)
F8 + V1: Battery Page / Cancel Preview
- Preview active: If a voice operation preview (Copy, Paste, Quantize, Clear) is already showing, F8+V1 cancels it without confirming
- No preview active: Shows the battery status page while F8 is held
F8 + V2: MIDI Settings
- Access: Press F8 + V2 repeatedly to cycle through the five MIDI settings pages
- Each press advances: [1] CLOCK SRC → [2] CLOCK OUT → [3] TX NOTE → [4] TX CC → [5] PATTERN SYNC → back to [1]
- All MIDI settings are saved to device settings and persist across power cycles
| Page | Label | Options | Default | Description |
|---|---|---|---|---|
| [1] | CLOCK SRC (CKS) | INT / MIDI | INT | Clock source: internal timer or incoming MIDI clock. When set to MIDI, the sequencer locks to received 24 PPQN clock pulses; a MIDI Start message activates sync |
| [2] | CLOCK OUT (CKO) | OFF / ON | ON | Send 24 PPQN MIDI clock pulses when using internal clock and the sequencer is running |
| [3] | TX NOTE (TXN) | OFF / ON | ON | Send a MIDI Note On + Note Off on channels 1–6 (matching voice 1–6) each time a voice fires. Note number = 60 + pitch semitones |
| [4] | TX CC (TXC) | OFF / ON | OFF | MIDI CC output — not yet implemented |
| [5] | PATTERN SYNC (PSY) | OFF / LEADER / FOLLOWER | OFF | Pattern sync between multiple MYNAHs: LEADER broadcasts the current pattern slot via MIDI ch16; FOLLOWER receives and auto-loads it — not yet implemented |
Voice Operations (F8 + V3–V5)
These operations apply to the currently selected voice. Hold F8 and press a voice button (V3–V5) to trigger the operation preview. Release F8 to confirm.
F8 + V3: Copy Voice / Paste Voice
- First press: Shows COPY VOICE preview while F8 is held
- Second press (while still holding F8): Switches to PASTE VOICE preview
- Third press: Wraps back to COPY VOICE
- Confirm: Release F8 to confirm the shown operation (copy or paste)
- Copy: Copies all voice settings (samples, ADSR, LFO, trigger modes, EQ, step data) for the current voice to an internal clipboard
- Paste: Applies the clipboard to the current voice, overwriting all its settings
F8 + V4: Quantize Voice
- Preview: Shows QNT (quantize) preview while F8 is held
- Confirm: Release F8 to quantize — snaps all live-recorded events for the current voice to the nearest 16th-note grid position
F8 + V5: Clear Voice
- Preview: Shows CLEAR preview while F8 is held
- Confirm: Release F8 to clear — resets all steps and parameters for the current voice to defaults
MIDI Control
All MIDI settings are accessed via F8 + V2 (cycles through five pages). Settings are saved to device settings and persist across power cycles. See the F8 + V2: MIDI Settings section for the full settings table.
MIDI Clock
Internal clock (default): The sequencer runs from the device’s internal high-precision timer. BPM is set with F8+A8.
MIDI clock input: Set CLOCK SRC to MIDI (F8+V2 [1]). The sequencer then locks tempo to incoming 24 PPQN MIDI clock pulses. A MIDI Start message activates sync and resets the sequencer to step 1.
MIDI clock output: When CLOCK OUT is ON (F8+V2 [2], default) and the internal clock is selected, the device sends 24 PPQN clock pulses via its MIDI output while the sequencer is running. This allows the MYNAH to act as the master clock for connected MIDI gear.
- Clock resolution: 24 PPQN (standard MIDI); the sequencer advances one 16th-note step every 24 clock pulses
- BPM range: 30–240 BPM
MIDI Note Input
Incoming MIDI notes on channels 1–6 trigger voices 1–6 respectively:
- Note-on on channel 1 triggers Voice 1; channel 2 triggers Voice 2; and so on up to channel 6
- The voice fires using the settings from step 0 of that voice (ADSR, trigger mode, EQ, velocity)
- Middle C (MIDI note 60) = pitch offset 0; notes above/below C4 transpose accordingly
- Last-note priority: Up to 8 simultaneous notes are tracked per voice in a note stack. When a note is released, the previously held note retriggers automatically (standard last-note-priority behaviour)
- Velocity: The incoming note velocity is applied and, if VELO TO CUTOFF (F1+A4 [2]) is set above 0, also modulates the voice’s low-pass filter cutoff
MIDI CC Input
Incoming MIDI Control Change (CC) messages on channels 1–6 update parameter values for voices 1–6 respectively. Receiving a CC message updates the global value for that voice and overrides/erases any per-step parameter locks (automation) for that parameter across all 16 steps.
- CC 7: Voice Volume (updates global voice volume; automatically un-mutes the voice if it was muted)
- CC 10: Pan (0 = full left, 64 = center, 127 = full right)
- CC 71: Voice Filter Q / Resonance (per-voice resonance amount)
- CC 74: Voice EQ / Filter Cutoff (0 = full Low-Pass, 64 = flat/bypass, 127 = full High-Pass)
- CC 91: Reverb Send (0–127 maps to 0–100% send amount)
- CC 92: Delay Send (0–127 maps to 0–100% send amount)
Pitch Bend Input
Incoming MIDI Pitch Bend messages on channels 1–6 update the continuous pitch bend applied to voices 1–6 respectively. Full pitch bend sweep equals a pitch shift of ±2 semitones, applied additively together with tuning parameter locks or LFO.
MIDI Note Output
When TX NOTE is ON (F8+V2 [3], default), each voice trigger sends a MIDI Note On followed immediately by a Note Off on the corresponding channel (Voice 1 = ch1, Voice 6 = ch6):
- Note number = 60 + pitch semitones (middle C = offset 0)
- Useful for triggering external MIDI synths or recording voice events into a DAW
Troubleshooting
No Audio Output
Check Audio Connections
- Verify cables are connected to the audio output
- Try a different speaker/headphone system
- Check for loose connections inside the enclosure
Check Output Volume
- Hold F8 and turn the pot to raise master volume
- Verify no voices are muted (double-tap V1-V6 toggles mute)
- Check per-voice volume levels (V1-V6 + pot)
Reset Audio System
- Power-cycle the device
- Wait for the startup logo
- Return to play mode and test
Recording Issues
No Sound Being Recorded
- Confirm the slide switch on the right side matches your source (MIC or LIN)
- The OLED should show REC:MIC or REC:LIN — if not, toggle the switch
- For mic: speak/play close enough to the device for an audible signal
- For line-in: confirm your external source is playing and connected
Recording Cuts Off
- The sequencer pauses automatically during recording — this is normal and it resumes when recording stops
- Maximum length: ~20 seconds (mic mono) or ~10 seconds (line stereo)
- Restart the device if a recording becomes unresponsive
Input Level Too Low
- Raise the volume of your external source
- For mic recordings, move closer to the device
- Consider an external preamp if your line source is very quiet
Button Not Responding
- Try the same button several times to rule out a momentary issue
- If a single button is consistently dead, or double-triggers, the affected button may need to be replaced
Potentiometer Issues
Pot Behaves Erratically
- The pot uses pickup mode: when you switch modes the new value is locked until you turn the pot through the current value
- If the pot feels scratchy or skips values, it may need cleaning or replacement
Display Issues
Display Flickering
- Try a different USB cable or power source
- A flaky USB cable is the most common cause of display flicker
SD Card Issues
SD Card Not Detected
- The SD card must be formatted as FAT32
- Ensure the card is fully inserted into the socket
- Try a different SD card (Class 10 or better recommended)
File Read/Write Errors
- Check that the SD card is not write-protected
- Verify file/folder names are not too long (full path must be 63 characters or fewer)
- Reformat the SD card (FAT32) if errors persist — back up your data first
Technical Specifications
Microcontroller
- Model: ESP32-S3 SuperMini
- CPU: Dual-core @ 240 MHz
Audio
- Sample Rate: 32 kHz
- Bit Depth: 16-bit
- Output: Stereo I2S DAC
- Input: Built-in microphone + stereo line-in
Storage
- Type: MicroSD card
- File System: FAT32
Power
- Input: 5V via USB-C
- Consumption: ~150-250 mA (varies with usage)
Dimensions
- Enclosure: 122 mm × 88 mm × 45 mm (approx.)
Web App
The MYNAH Web App is a browser-based utility that connects to the device over USB serial (WebSerial API). It runs entirely in the browser — no installation required — and provides a set of tools that are not available on the device itself.
Connection: Click Connect in the app header and select the JTAG/CDC port when the browser’s port picker appears. A green dot in the header confirms an active connection.
Browser requirement: WebSerial is supported in Chromium-based browsers (Chrome, Edge, Brave). Firefox and Safari are not supported.
Stem Export
Exports each voice of a pattern as a separate WAV file — one file per voice — for use in a DAW or other software.
- Connect the device and expand a Bank in the Pattern Browser
- Click one or more Patterns to add them to the Export Queue
- Optionally enter custom Voice Labels to name the stem tracks
- Click Choose Output Folder to select a destination on your computer
- Click Render Stems — each voice is exported as a 44.1 kHz stereo WAV file
Bounce
Mixes all voices of a selected pattern down to a single stereo WAV file on your computer. More flexible than the on-device bounce (F8+A5) — it supports multiple loops, optional resampling to 44.1 kHz, and a configurable reverb/delay tail.
- Connect and select a Pattern from the Pattern Browser
- Set Loops (number of full pattern repeats), enable Resample to 44.1 kHz if required, and set a Tail duration (ms) to capture reverb/delay fade-out
- Click Choose Output Folder, then Bounce Pattern
Songs
Manage song names and back up or restore individual songs.
- Rename: Select a song in the Song Browser, type a new name (max 16 characters), and click Save Name
- Backup: Choose a Bank and Song, then click Backup to download a
.mynahbakfile to your computer - Restore: Click Restore Backup…, select a
.mynahbakfile, choose a target Bank/Song slot, and click Restore to Selected Slot — existing data in that slot is overwritten
Firmware Update
Flashes new firmware to the device over USB without needing PlatformIO or any other tools.
- Connect the device
- Select a firmware version from the list, or click Browse… to load a local
.binfile - Click Flash Firmware and select the JTAG/CDC port when prompted
- Wait for the progress bar to complete — do not disconnect during flashing
- The device resets automatically; SD card data is not affected
SD Cleanup
Scans the SD card for orphaned audio files — recordings and bounced files that are no longer referenced by any song — and permanently deletes them to recover storage space.
- Connect the device and click Scan for Orphaned Files
- Review the list of files identified as orphaned
- Click Delete Orphaned Files to remove them — this cannot be undone
Only files in
/SAMPLES/BOUNCEDand/SAMPLES/RECORDINGSare considered. All other sample folders are left untouched.
Screen Mirror
Streams a live mirror of the device’s OLED display in the browser at up to 10 fps. Useful for live demos, tutorial recordings, and debugging.
- Streaming starts automatically when the tab is active and a device is connected
- Switching to any other tab pauses streaming and resumes normal web-app mode
- Click Export JPG to save a snapshot of the current screen