Here are the operating instructions for the latest firmware version of the Groovesizer THEREMON.
Navigation
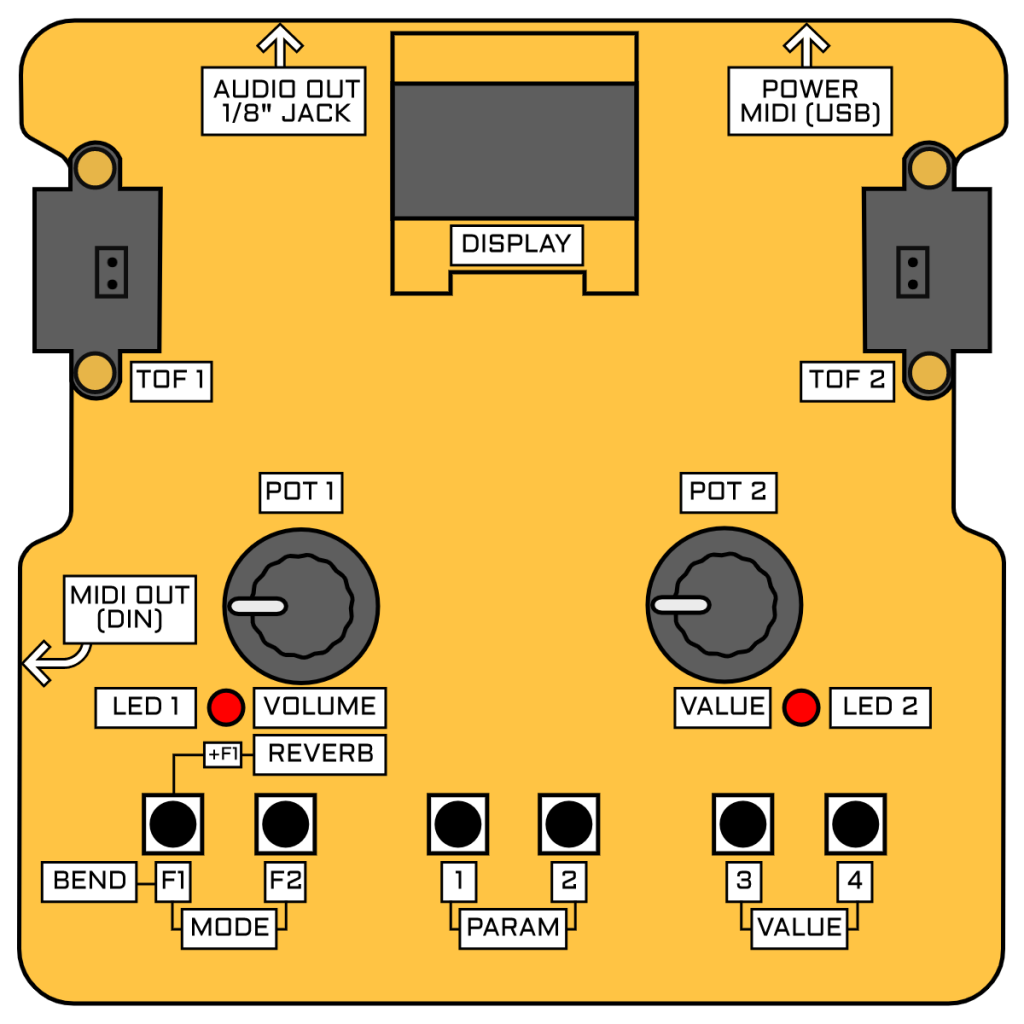
- Mode Selection (Buttons F1 & F2) – Use F2 to select the next mode, and F1 to select the previous mode. Since F1 and F2 also act as function buttons, mode switching occurs on release of the button. Note: F1 additionally serves to engage momentary pitchbend when the player’s hand is hovering over the ToF sensor assigned to pitch. While the player’s hand is present, F1 will not respond to mode changes.
- Parameter Selection (Buttons 1 & 2) – Use 2 to select the next parameter, and 1 to select the previous parameter. Live Mode has 3 parameters, Song Mode has 2, while Setup Mode has a number of pages of parameters.
- Value Selection (Buttons 3 & 4, P2) – Use 4 to select the next value increment, and 3 to select the previous value increment. Alternatively, use Pot 2 for value selection.
- Volume (P1)- Adjust the volume with Pot 1.
- Reverb (F1 + P1)- Adjust the reverb level by turning Pot 1 while holding F1 down.
Modes
THEREMON has 3 operating modes: Play Mode, Song Mode, and Setup Mode.
1. Play Mode

1. 1 Parameters
1. 1. 1 Voice
Theremon uses the Teensy Audio Library for sound generation, specifically the Waveform node. The available wave shapes are:
- Sine
- Saw
- Square
- Triangle
- User
- Pulse
- Reverse Saw
- Sample & Hold
- Var. Triangle ( Variable Triangle )
1.1.2 Root
Sets the root note of the current scale. The available range is G#1 to E8.
1.1.3 Scale
Theremon has a number of pitched scales, along with a theremin style free pitch mode. Free pitch mode is the final scale in the list – to access it quickly, turn Pot 2 all the way clockwise. The available scales are:
- Major
- Minor
- Min Harm (Harmonic Minor)
- Penta Maj (Major Pentatonic)
- Penta Min (Minor Pentatonic)
- Blues Hex (Hexatonic Blues)
- Blues Hept (Heptatonic Blues)
- Maj Triad (Major Triad)
- Min Triad (Minor Triad)
- Major 7th
- Minor 7th
- Raga Bhairav
- Spanish
- Romani
- Arabian
- Egyptian
- Hawaiian
- Bali Pelog
- Miyakobushi
- Ryukyu
- Wholetone
- Free Pitch (Theremin mode)
1.2 Saving Parts (Presets)
Press and hold F2 to save the current patch settings. The current patch settings including voice, root note, scale, along with volume and reverb levels will be saved to a preset (Part) that can be recalled in Song Mode. Presets are organized into songs and parts. Theremon has enough memory to store 20 songs, each with 10 parts – the idea is to make it easier to integrate Theremon in a live set by letting the user group together all the parts required for the different sections of a song.

On the Save page, choose the song and part to save to. Hold F2 again to save the preset to the selected location, or press any other button to cancel the operation. If the selected part slot is not in use, the part will be saved immediately and the message SAVED! will be shown momentarily. If the part slot is currently occupied, a confirmation page will be shown.

- Cancel (Button F1) – Press F1 to cancel.
- Save (Button F2) – Press F2 to complete the save operation. The message SAVED! will be shown momentarily.
2. Song Mode

Song Mode allows the player to recall parts saved in Play Mode.
2. 1 Parameters
2.1.1 Song
Sets the current song. The available range is S1 to S20. On selecting a different song, the currently selected part will be loaded immediately if the part slot for that song is occupied.
2.1.2 Part
Sets the current part. Parts range from P1 to P10. On selecting a different part, the new part will be loaded immediately if the selected part slot is in use.
2.2 Notification Line
The third parameter line shows the status of the currently selected part.
- Free! – The slot is not in use.
- Not Loaded! – Displayed whenever the player changes into Song Mode to alert the player to the fact that the currently selected part is not yet loaded. On changing to Song Mode, the display will show the last selected part. The part is not automatically loaded to prevent unintended changes to the current Play Mode settings.
- Loaded! – The currently selected part is loaded.
3. Setup Mode

Setup Mode allows the player to change and store various instrument settings. Saved settings are recalled when Theremon is powered on. Settings are grouped into pages with a maximum of three parameters each. The page number is displayed at top right (eg. 1/4 for the first page).
3.1 Settings
- Pitch – Select whether the left or right ToF sensor is assigned to pitch.
- Left – The ToF sensor on the left handles pitch, and the one on the right handles volume.
- Right – The ToF sensor on the right handles pitch, and the one on the left handles volume.
- Default: Right
- P Max – Set the maximum sensing distance for the ToF sensor assigned to pitch
- Range: 50mm – 500mm
- Default: 400mm
- V Max – Set the maximum sensing distance for the ToF sensor assigned to volume
- Range: 50mm – 500mm
- Default: 200mm
- Steps – Set the number of steps or note increments that the range of the pitch ToF is divided into when using any of the scales.
- Range: 2 – 30
- Default: 15
- P Chn – Set the MIDI Channel that note data and pitch CC data is transmitted on.
- Range: 1 – 16
- Default: 1
- P CC – Set the MIDI Control Change (CC) that pitch data is transmitted on.
- Range: 0 – 127
- Default: 0
- Note: Pitch CC data is only transmitted when the Scale setting in Play Mode is set to free pitch (Theremin) mode
- V Chn – Set the MIDI Channel that volume CC data is transmitted on.
- Range: 1 – 16
- Default: 1
- V CC – Set the MIDI Control Change that volume data is transmitted on.
- Range: 0 – 127
- Default: 1
- LEDs – Sets the usage of the LEDs.
- Off – The LEDs are not used and never light up.
- MIDI – Reflects the MIDI values that are being transmitted
- Volume: The LED on the side that is assigned to volume glows brighter for higher CC values
- Pitch: In free pitch mode, the LED on the side assigned to Pitch glows brighter for higher CC values. With any of the scales selected, the LED flashes momentarily for every Note On message sent.
- Tuning – In free pitch mode only, both LEDs light up when the current pitch is on or close to the nearest semitone.
- Default: Tuning
- P Bnd – Sets the pitch bend range in semitones
- Note: This only affects pitch bend for the internal synth. When using pitch bend with an external MIDI instrument, the bend range can usually be set on the receiving instrument.
- P Inv – Inverts the direction of the pitch ToF sensor
- Yes – Moving closer to the ToF sensor raises the pitch
- No – Moving closer to the ToF sensor lowers the pitch
- V Inv – Inverts the direction of the volume ToF sensor
- Yes – Moving closer to the ToF sensor decreases the volume
- No – Moving closer to the ToF sensor increases the volume
- Mute – Mute or unmute the internal synth. An icon of a speaker with an x next to it is displayed when Theremon is muted.
3.2 Saving Settings
A star icon is displayed in the top right corner when any setting is changed, but not yet saved. To save settings, press and hold F2. The message SAVED! will be shown momentarily.
MIDI Implementation (USB Input)
1. Playing the Internal Synth
- Receiving on MIDI CHANNEL 1
- Theremon responds to Note On, Note Off and Velocity messages.
2. Setting Scale and Root Note
- Receiving on MIDI CHANNEL 2
- The note number of any Note On message received sets the root note.
- The Velocity of the Note On message sets the scale type (a velocity value of 1 sets the Major scale, a velocity value of 2 sets the minor scale, etc).
3. Selecting Song and Part
- Receiving on MIDI CHANNEL 3
- Note On messages with a note number value in the range 36 – 55 set the Song (eg. Note Number 36 sets Song 1).
- Note On messages with a note number value in the range 60 – 69 set the Part (eg. Note Number 60 sets Part 1).
- Note: The selected parts will be loaded as soon as the part change Note On message is received provided the Part slot is in use.
MS, June 2019