The Groovesizer Golf is a 32-step, 12-track MIDI drum sequencer.
The Golf features individual control of MIDI channel, MIDI note number, note level, accent level, and flam settings (tempo delay) for each track. There are 112 save locations for user patterns and patterns can be chained together into longer patterns.
Firmware
Want to look at the firmware code or change it? Be our guest! You’ll need the Arduino IDE to edit, compile and upload the firmware.
Download the current firmware version: Groovesizer_Golf_027
See the bottom of this page for the changelog.
(User tub has forked the Golf firmware – have a look at his changes on GitHub.)
Libraries
To compile the firmware, you will need the following libraries installed:
Download the above library files and keep them zipped. To install them from the Arduino IDE, use Sketch/Import Library/Add Library. For more detailed instructions, see this guide.
Jumpers
The Golf firmware uses the same jumper configuration as the Delta firmware:

All set?
The Groovesizer Golf makes no sounds of its own, but sends out MIDI note data to an attached MIDI drum module or software drum synth. Connect a MIDI cable form the Golf’s MIDI output to the module’s MIDI input, or to the MIDI input of your computer’s sound card in the case of a software drum module.
The Groovesizer Golf has three operating modes: Edit Mode, Master Mode and Trigger Mode, as well as a Preferences Page . Toggle between the different modes with Shift L. Enter the preferences page from Master Mode by holding Shift R and pressing Shift L.
On first turning on, you’ll be in
EDIT MODE (neither Shift L or Shift R is lit):
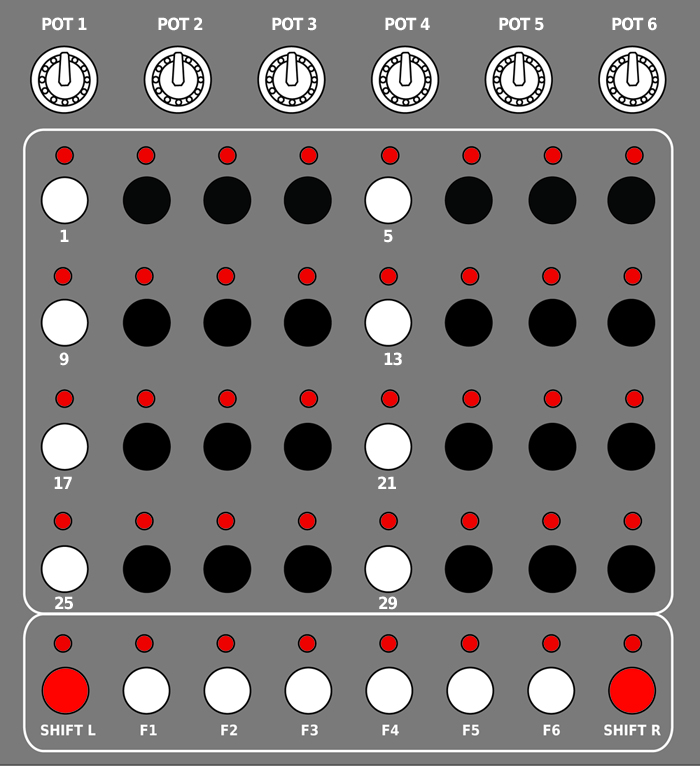
Pot Behavior
- Pot 1 – MIDI Channel for the current track.
- Pot 2 – MIDI Note Number sent by the current track.
- Pot 3 – Flam Decay for the current track (the MIDI velocity value by which each consecutive flam/delay tap is reduced ).
- Pot 4 – Flam Delay (how far apart flam/delay taps are spaced). With Shift L held, the Flam Delay will be based on the current tempo.
- Pot 5 – Note Velocity for the current track.
- Pot 6 – Accent Velocity for the current track.
Button Behavior
- Track Select 1 – 6 (F1 – F6) – Press F1 – F6 once.
- Track Select 7 – 12 (F1 – F6 – press Shift R once – with the LED for Shift R lit, F1 – F6 correspond to tracks 7 – 12.
- Track Audition (F1 – F6) – With the desired track already selected, pressing the corresponding function key (F1 – F6) again will send a trigger message with the current settings.
- Add a step (Button 1- 32) – Press any button from 1 – 32 to add a step. The MIDI velocity for a normal step is set with Pot 5.
- Remove a step (Button 1 – 32) – Press the button for any active step again, to remove the step. This also remove accents and flams.
- Add an accent (Shift L & Button 1 – 32) – To add an accent to a step, hold Shift L and press the button for the step (Button 1-32). An accented step is created whether the step was previously active or not. To set the MIDI velocity for an accented step, use Pot 6. NOTE: it’s possible to set the velocity level of accented steps lower than that of normal steps – it’s up to you.
- Add a flam (Shift R & Button 1 – 32) – To add a flam to a step, hold Shift R and press the button for the step (Button 1 – 32). A flam step is created whether the step was previously active or not. Adjust the flam decay with Pot 3, and the flam delay with Pot 4. When Shift L is held while adjusting Pot 4, the flam delay is synced to the current tempo with a range form 32nd triplets to quarter notes.
- Clear All Selected (Shift L & F1) – Clear all selected steps by holding Shift L and pressing F1. This also clears accents and flams.
- Clear All (Shift L & Shift R) – Hold Shift L and press Shift R to clear a pattern completely – this includes accents and flams.
MASTER MODE (both Shift L and Shift R are lit):
Pot Behavior
- Pot 1 – MIDI Channel for the current track.
- Pot 2 – Playback Window – if the pattern is current set to play back less than the maximum 32 steps, Pot 2 shifts the playback window to the left and right.
- Pot 3 – Pattern Start – the first step of the pattern.
- Pot 4 – Pattern Duration – from 1 – 32 steps.
- Pot 5 – Swing / Shuffle.
- Pot 6 – Tempo – from 45 bpm to 255 bpm.
- Shift L + Pot 6 – Clock Division
- Master
- Slave
Button Behavior
- Stop / Start (F1) – If the sequencer is running, press F1 to stop playback and rewind to the first step. If the sequencer is not running, press F1 to restart playback.
- Tap Tempo (F2) – Press F2 repeatedly to set a new tempo.
- Mutes (F3) – With the LED for F3 lit, pressing any step (Button 1 -32) will mute that step on all tracks.
- Skips (F4) – With the LED for F4, pressing any step (Button 1 – 32) will cause the step to be skipped over.
- Nudge tempo – slower (F5) – For each press of F5 the tempo is lowered by 1 bpm. The current bpm will be displayed. (When displaying numeric values, values over 99 are indicated with the LED for Shift L lit. Values over 199 are indicated with the LEDs for both Shift L and Step 25 lit. ) When the Groovesizer is slaved to MIDI clock, pressing F5 will shift pattern playback on this unit 1 ppq (pulses per quarter) later relative to the master (the latter feature is best illustrated in this video).
- Nudge tempo – faster (F6) – For each press of F6 the tempo is increased by 1 bpm. The current bpm will be displayed. When the Groovesizer is slaved to MIDI clock, pressing F6 will shift pattern playback on this unit 1 ppq (pulses per quarter) earlier relative to the master.
- True Step (Shift R) – When adjusting the length of a pattern during playback, it is possible for the Golf to fall out of sync with other devices running on the same MIDI clock. Pressing Shift R forces the playback position to jump to the true current step. This is also helpful to correct instances where a pattern with swing has flipped around with the longer step now the shorter one.
TRIGGER MODE (Shift L is lit – Toggle with Shift L):
Pot Behavior
There are currently no functions mapped to the pots in Trigger Mode.
Button Behavior
- Trigger Page (Shift L & F1 – F 4 ) – Select a trigger page by holding Shift L and pressing F1 to F4. Pages 1 to 3 each has 32 save locations, but on page 4 only the first 16 locations are available.
- Pattern Recall (Button 1 – 32) – The buttons from 1 – 32 represent pattern save locations (page 4 exluded – see above). If a pattern is stored in a location its LED will be lit. Cue a pattern to play next by pressing its button. The currently playing pattern will be indicated by with slow blink. The pattern cued to play next is indicated with a fast blink. Pattern selection is quantized to the closest bar – it means the pattern will only change once step 1 or step 17 is reached.
- Pattern Save (Long-press button 1 – 32) – Long-press a location to store the current pattern there. If the location is not currently occupied, the pattern will be stored immediately. Once step 1 or 17 is reached (pattern recall is quantized to the closest bar), the location will start to slow-blink to indicated that it is currently playing. If the location is already in use (ie. a pattern is already stored there), the location will fast-blink to indicate that it’s waiting for confirmation. Press the location again to overwrite the pattern stored there with the current pattern. Press any other button to cancel the save request.
- Clear Save Location (Shift L & button 1 -32) – To clear a save location and permanently delete the pattern stored there, hold Shift L and press the location. It will fast blink to show it’s waiting for confirmation. Press the location again (no shift) to confirm, or anything else to cancel.
- Step Repeat (F1) – The current step will be repeated as long as F1 is held down. When F1 is released, the playback position will jump to the true step.
- Reverse (F2) – Playback will be reversed for as long as F2 is held down. When F2 is released, the playback position will jump to the true step.
- Random Hit (F3) – When F3 is pressed a tempo synced flam will be added to a number of radomly selected tracks.
- Pattern Chaining: Return To Head (Shift L & F5) – Use this to mark the last pattern in a chain. When F5 is lit, the pattern marked as the head of a pattern chain will be loaded and played once playback reaches the end of the current pattern. The last pattern selected is marked as the head of the chain. The pattern will continue to loop until a preceding pattern is selected as the head of the pattern chain.
- Pattern Chaining: Next Pattern (Shift L & F6) – When F6 is lit, the following pattern will be loaded and played once playback reaches the end of the current pattern. The pattern has to be re-saved before pattern chaining takes effect. If the following pattern location is empty, the current pattern will loop instead.
PREFERENCES PAGE (to enter hold Shift R and press Shift L while in Master Mode):
- Sync Out (F1) – With the F1 led lit, the Groovesizer sends out MIDI timing clock messages (also known as MIDI beat clock) at 24ppq (pulses per quarter). Enable this option if you want to slave other MIDI devices (eg. more Groovesizers!) to this unit.
- Thru On (F2) – This option controls which MIDI messages received at the Golf’s MIDI input will be echoed at the MIDI output. When if F2 is not lit, no incoming messages will be passed to the output. If this option is set to 1, all incoming messages will be passed to the output. With the option set to 2, only system messages such as Clock, Stop and Start will be echoed, but any note messages will be filtered out and not passed to the output. Change the current setting by holding F2 and andjusting the value with Pot 6.
- Trigger Out (F3) – With F3 lit, the Groovesizer sends out pattern change messages. When the user changes a pattern in Trigger Mode on this device, any slaved Groovesizers will also change to the corresponding pattern (provided the slave has a pattern stored in that slot). Change the MIDI channel trigger messages are sent on by holding F3 and selecting the channel with Pot 6.
Here’s a feature overview of the Golf firmware.
Changelog
V027 2015-03-11 Groovesizer_Golf_027
- updated for compatibility with Arduino MIDI Library v4.2
V026 2015-02-03 Groovesizer_Golf_026
- time divisions are now saved and recalled on a per-patch basis
V025 2015-02-02 Groovesizer_Golf_025
- implemented a new interrupt based internal clock for improved stability
- overhauled sync as slave – the sequencer now responds promptly to start messages
- implemented time divisions
- master: set the sequencer to fire on 16ths, 16th triplets, or 32nds relative to the internal clock
- slave: 8ths, 16th, 32nds relative to incoming MIDI clock
V020 2014-05-10 Groovesizer_Golf_020