This page is provided for reference only. This is not the current version of the Alpha firmware. For the current version, please go here.
Download Groovesizer_Alpha_100
To run the Alpha firmware successfully, make sure you have the jumpers on the options header configured as follows:

All set?
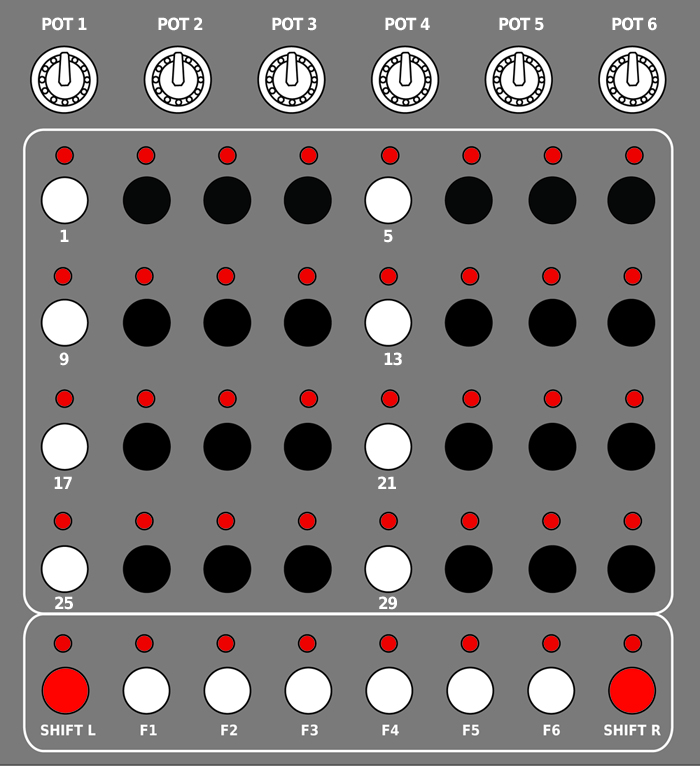
The Groovesizer Alpha has three operating modes: Edit Mode, Trigger Mode and Pot-shift Mode, and a Preferences Page.
On first turning on, you’ll be in
EDIT MODE (neither Shift L or Shift R is lit):
Pot Behavior
- Pot 1 – Voice 3 waveform. Clockwise from the left Sine, Square, Triangle, Sawtooth.
- Pot 2 – Voice 3 pitch. From unison to 2 octaves above Voice 1.
- Pot 3 – Voice 2 waveform.
- Pot 4 – Voice 2 pitch. With Shift R pressed, record automation for Voice 2 pitch.
- Pot 5 – Voice 1 waveform.
- Pot 6 – Step / Voice 1 pitch for selected steps.
Button Behavior
- Step Select Page (F1 is lit – the default page when the Groovesizer is switched on) – Press any button from 1 – 32 to select the corresponding sequencer step. Selected steps are indicated with a fast blink. Change the pitch of selected steps with Pot 6. Deselect a step by pressing it again.
- Stop/Start/Rewind (F1) – If you’re already on the step select page, pressing F1 will stop playback. Pressing F1 again will restart playback from the first step.
- Clear All Selected (Shift L & F1) – Clear all selected steps by holding Shift L and pressing F1. This also works for mutes, ties and slides.
- Clear Step (Shift L & step) – Hold Shift L and press an active step to clear it.
- Step Mute Page (F2) – Press an active (lit) step to mute it. Muted steps are indicated with a fast blink. Clear a mute by pressing the step again.
- Step Tie Page (F3) – Active steps are lit. Press a step after an active step to tie it to the preceding step. Steps can also be tied to other tied steps. Tied steps are indicated with a fast blink. Clear a tie by pressing the step again.
- Step Slide Page (F4) – Active steps are lit. Select the first of two consecutive active steps to slide in pitch from the first to the second. If the step after a Slide step is not active, the step will slide down to a pitch value of zero. Slide steps are indicated with a fast blink. Clear a slide by pressing the step again.
- Pattern Transpose Down (Semitone) (F5) – Press F5 to transpose the whole pattern down by a semitone.
- Pattern Transpose Down (Octave) (Shift L & F5) – Holding Shift L and pressing F5 will transpose the whole pattern down by an octave.
- Pattern Transpose Up (Semitone) (F6) – Press F6 to transpose the whole pattern up by a semitone.
- Pattern Transpose Up (Octave) (Shift L & F6) – Holding Shift L and pressing F6 will transpose the whole pattern up by an octave.
- Clear All (Shift L & Shift R) – Hold Shift L and press Shift R to clear a pattern completely – this includes notes, mutes, slides, ties and slides.
POT-SHIFT MODE (Shift R is lit – Toggle with Shift R):
Pot Behavior
- Pot 1 – Random pattern note density.
- Pot 2 – XOR distortion.
- Pot 2 (Accent page) – adjust accent level.
- Pot 3 – Pattern length.
- Pot 4 – Swing.
- Pot 5 – Note duration.
- Pot 6 – Tempo.
Button Behavior
- Random Pattern (Chromatic) (F1) – Press F1 to create a random pattern. A step can be any interval from an octave below to an octave above the preceding step.
- Random Pattern (Major) (F2) – Press F2 to create a random pattern in a major scale. Pattern generation is weighted so there’s a larger probability that the pitch of a step will be one of the major triad. The root note is the last note value that was assigned in edit mode. (To change the root note, in other words, hop back into edit mode, select a step, and assign it the desired pitch with Pot6.)
- Random Pattern (Minor) (F3) – Press F3 to create a random pattern in a major scale. Similar to pattern generation in the major scale, there’s a larger probability that a step’s pitch will be of the minor triad. The root note is the last note value that was assigned in edit mode.
- Random Pattern (Pentatonic) (F4) – Press F4 to create a random pattern in a pentatonic scale.
- Infinite Random (Shift L & F1 – F4) – The same as above, but on reaching the end of the pattern a new random pattern is generated. The LED for the appropriate scale will be lit to indicate infinite random mode.
- Transpose Selected Down (Semitone) (F5) – Press F5 to transpose any selected steps down by a semitone.
- Transpose Selected Down (Octave) (Shift L & F5) – Holding Shift L and pressing F5 will transpose selected steps down by an octave.
- Transpose Selected Up (Semitone) (F6) – Press F6 to transpose selected steps up by a semitone.
- Transpose Selected Up (Octave) (Shift L & F6) – Holding Shift L and pressing F6 will transpose selected steps up by an octave.
- Tap Tempo (F6 – no steps selected) – With no steps selected, tap F6 repeatedly to set the tempo.
- Accent Page (F5 – no steps selected) – With no steps selected, press F5 to enter the accent page. Toggle step select buttons 1 – 32 to add an accent to or remove an accent from a step. While on the accent page, use Pot2 to adjust the accent level. Press F5 again to exit the accent page.
TRIGGER MODE (Shift L is lit – Toggle with Shift L):
Pot Behavior
Identical to Edit Mode, with the exception that automation can only be recorded in Edit Mode.
Button Behavior
- Trigger Page (Shift L & F1 – F 4 ) – Select a trigger page by holding Shift L and pressing F1 to F4. Pages 1 to 3 each has 32 save locations, but on page 4 only the first 16 locations are available.
- Pattern Recall (Button 1 – 32) – The buttons from 1 – 32 each represents a pattern save location (page 4 exluded – see above). If a pattern is stored in a location its LED will be lit. Cue a pattern to play next by pressing it’s button. A pattern currently playing will be indicated with a slow blink. The pattern cued to play next is indicated with a fast blink. Pattern selection is quantized to the closest bar – it means the pattern will only change once step 1 or step 17 is reached.
- Pattern Save (Long-press button 1 – 32) – Long-press a location to store the current pattern there. If the location is not currently occupied, the pattern will be stored immediately. Once step 1 or 17 is reached (pattern recall is quantized to the closest bar), the location will start to slow-blink to indicated that it is currently playing. If the location is already in use (ie. a pattern is already stored there), the location will fast-blink to indicate that it’s waiting for confirmation. Press the location again to overwrite the pattern stored there with the current pattern. Press any other button to cancel the save request.
- Clear Save Location (Shift L & button 1 -32) – To clear a save location and permanently delete the pattern stored there, hold Shift L and press the location. It will fast blink to show it’s waiting for confirmation. Press the location again (no shift) to confirm, or anything else to cancel.
- Pattern Reverse (F1) – Press F1 to reverse the playback of the pattern.
- Step Repeat (F2) – The current step will be repeated as long as F2 is held down.
- Pattern Chaining: Return To Head (F4) – Use this to mark the last pattern in a chain. When F4 is lit, the pattern marked as the head of a pattern chain will be loaded and played once playback reaches the end of the current pattern. The last pattern selected is marked as the head of the chain. The pattern has to be re-saved before pattern chaining takes effect. After saving, the pattern will continue to loop until a preceding pattern is selected as the head of the pattern chain.
- Pattern Chaining: Next Pattern (F5) – When F5 is lit, the following pattern will be loaded and played once playback reaches the end of the current pattern. The pattern has to be re-saved before pattern chaining takes effect. If the following pattern location is empty, the current pattern will loop instead.
- True Step (F6) – When using functions like Pattern Reverse and Step Repeat, the sequencer deviates from the actual current step. For example, if the Groovesizer is synced to another device and both are on the same step, pressing Step Repeat once will cause the Groovesizer to lag behind the synced device by a step. To realign the Groovesizer and make it snap back to the true step, press F6.
PREFERENCES PAGE (Shift L and Shift R are lit – enter by holding Shift R and pressing Shift L – exit with either Shift L or Shift R):
- Note Out (F1) – With this option selected (F1 led is lit), sequencer notes are sent out via MIDI during playback. You may want to switch this off if you are chaining Groovesizers and only want notes from one unit to be sent out (by default, the Groovesizer echoes all MIDI messages it receives at its input).
- Automation Out (F2) – If the F2 led is lit, any recorded automation is sent out via MIDI as control change messages when the sequence is playing. Automation is sent at 24ppq (pulses per quarter note) on MIDI cc16 (General Purpose Controller 1).
- Note Entry (F3) – Choose this option (F3 led is lit) if you want to enter note sequences with an attached midi keyboard. To do so, the Groovesizer should be in Edit Mode and the sequence should not be playing (stop sequence playback with F1). Incoming MIDI notes are assigned to consecutive steps in the sequencer and the led for the current step will be lit.
- Notify (F4) – With the F4 led lit, the Groovesizer will send notifications via scrolling text. Turn this off if you don’t want to see the firmware message every time you turn the Groovesizer on.